
Starting from open source BI Helical Insight 6.1.0.826 GA, the Table component has been introduced in the Canned Report module to enable users to display structured, row-wise data in a tabular format. This component allows report designers to bind query results to columns, repeat rows dynamically for each record, and apply formatting and aggregations to present detailed and organized data within reports.
In earlier versions, tabular layouts had to be built manually by arranging individual fields and configuring repeat-by options. With the introduction of the Table component, users can now create tabular visualizations in a faster and more effective way within the Canned Report module.
Steps to create a tabular visualization in Canned Reporting :
-
Create a data source connection
Refer the following documentation for this step https://www.helicalinsight.com/data-sources-page-overview-in-canned-reporting
-
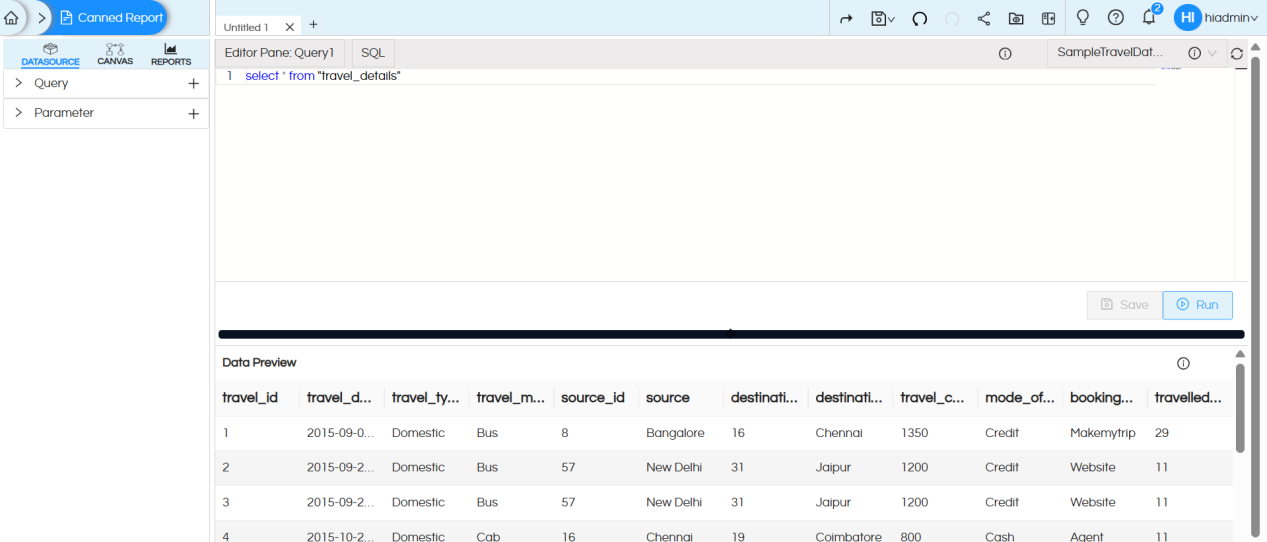
Once the datasource connection is created, select the connection and write the SQL query. Click on Save and Run to execute the query
The first 10 records of the result set will be displayed in the Data Preview section, this is helpful to understand whether the data being fetched from the SQL is correct or not.
-
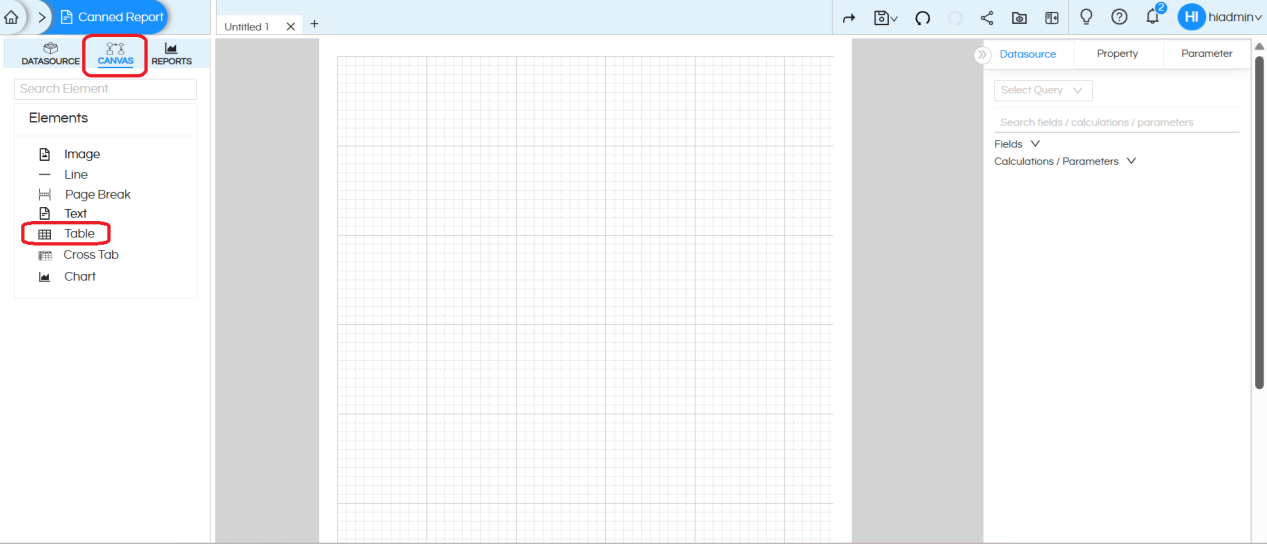
In the CANVAS tab, you will find the Table component under the Elements list
-
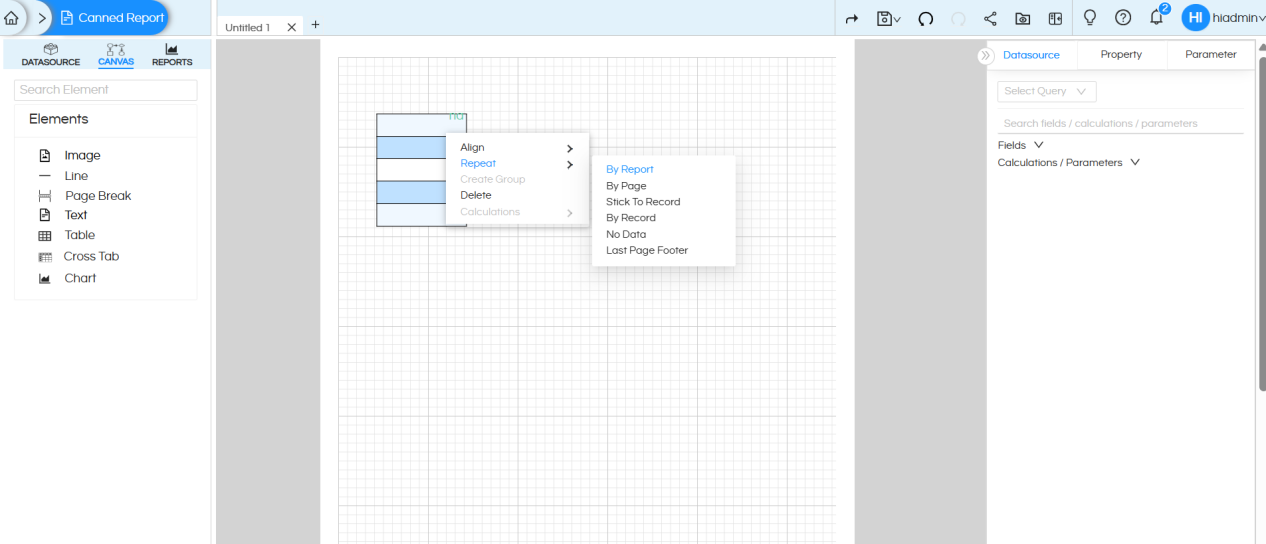
Drag the Table component onto the canvas, then right-click on it and select the ‘Repeat‘ option. In most use cases it will be ‘By Report‘
-
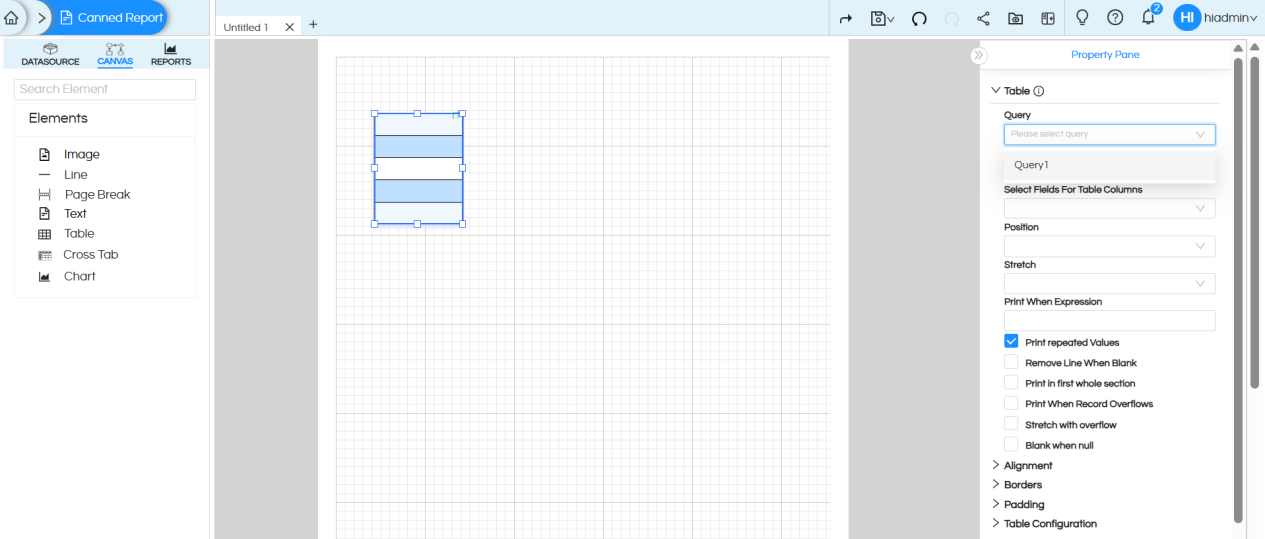
Click on the Table component. On the right side, you will see the Table configuration options/Properties. Below we have explained each and every component in detail
-
Query
Purpose: Specifies the data source for the table.
How it works: While making the datasource connection, we have written query. We can write multiple queries also there. You can select a query (like Query1) which will be used for the table.
-
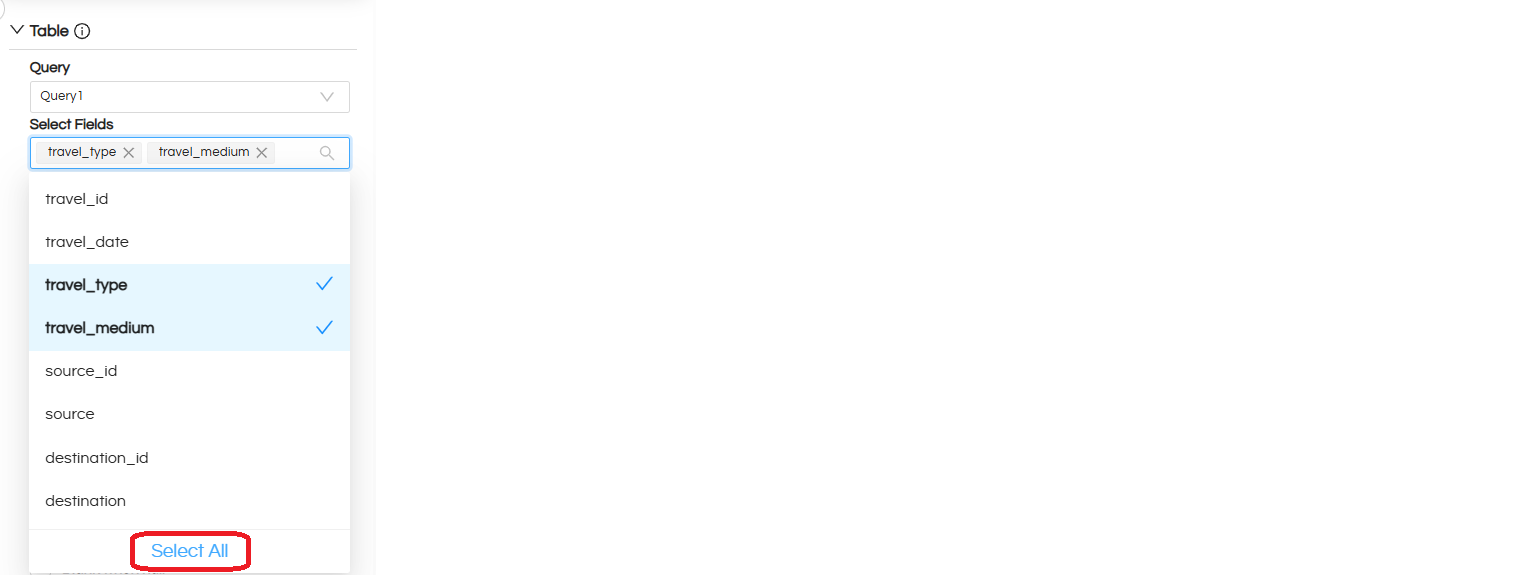
Select Fields:
Please select the all the columns from the query that you want to display in the table.
-
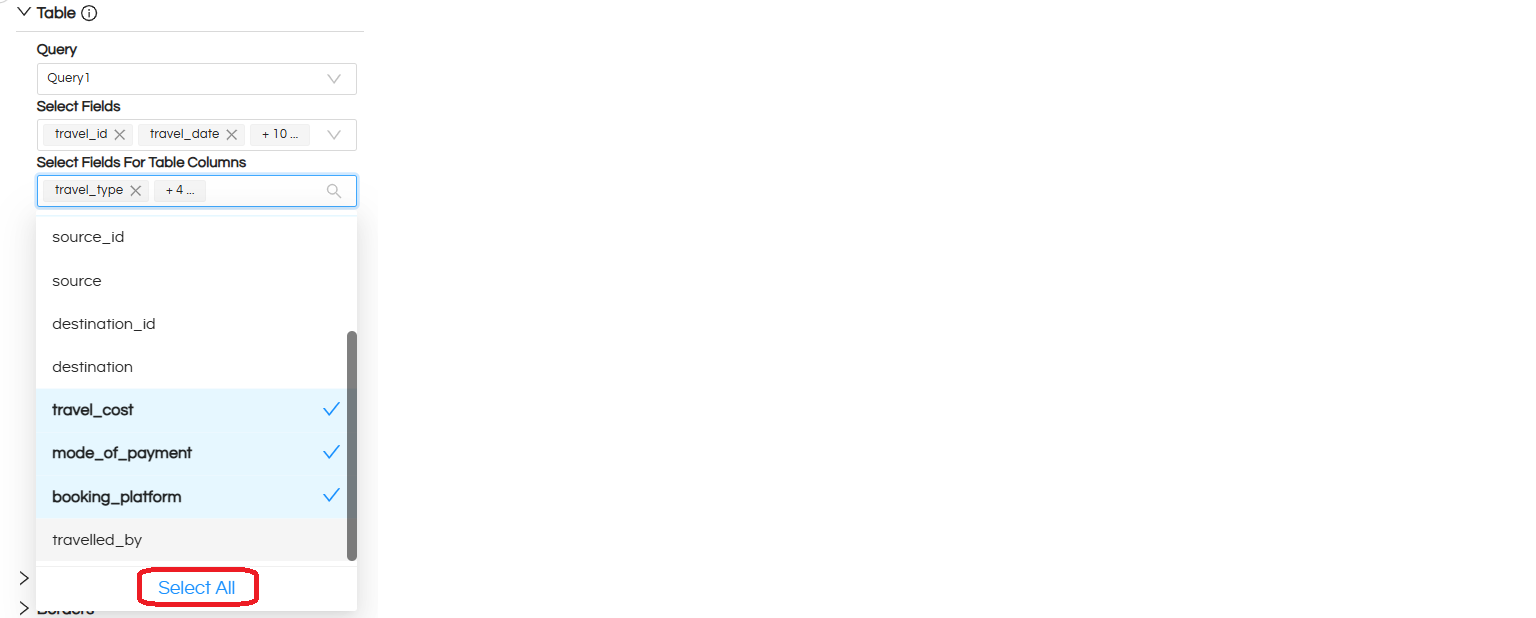
Select Fields For Table Columns:
From the fields selected in step 2 at “Select Fields”, now you can choose the fields from that list which will be used to produce the table columns.
-
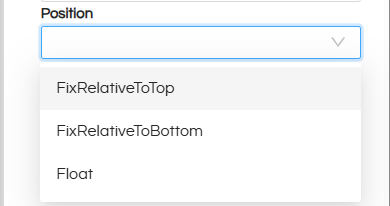
Position
Determines how the table is positioned in the report. Options:
- FixRelativeToTop: Table stays fixed relative to the top.
- FixRelativeToBottom: Table stays fixed relative to the bottom.
- Float: Table moves freely and can be placed anywhere. If multiple tables are being used, then this option is better choice.
-
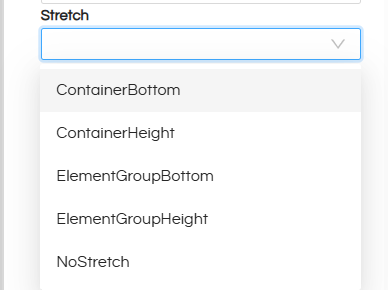
Stretch
Purpose: Specifies the graphic element stretch behavior when the report section is affected by stretch.
-
ContainerBottom
The table expands downward until it touches the bottom of its container (such as a frame or band).
Useful when you want the text to fill all available vertical space inside its container. -
ContainerHeight
The table always matches the full height of its container.
The height stays the same even if the text content is small or large. -
ElementGroupBottom
When the table is inside a group, it stretches until the bottom of the entire group.
Useful when grouped elements need to align at the bottom. -
ElementGroupHeight
The table stretches to match the total height of its group.
Helps keep all grouped elements the same height and maintain a consistent layout.
This is usually the most commonly used option. -
NoStretch
This is the default behavior.
The table does not stretch, even if the content is larger than the available space.
-
ContainerBottom
-
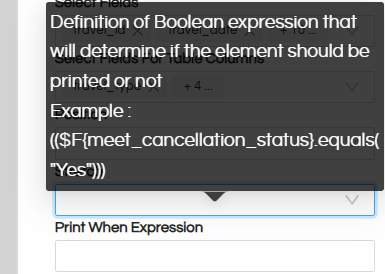
Print When Expression
Purpose: Conditional printing of the table. We can put an expression here and based on that this column will be printed or not printed.
-
Print Repeated Values
Purpose: Controls whether repeated values in rows are printed or left blank.
-
Remove Line When Blank
Purpose: Removes the table row if all columns in that row are blank.
Use Case: Avoids empty rows appearing in reports.
-
Print in First Whole Section
Purpose: Prints the table only at the start of a section (useful in multi-section reports).
-
Print When Record Overflows
Purpose: Controls printing when the table spans multiple pages or sections.
Use Case: Ensures content is not skipped if it overflows the current page.
Stretch with Overflow
Purpose: Lets the table grow if the content is larger than its allocated area.
-
-
Blank When Null
Purpose: If a field is NULL, it shows as blank instead of printing NULL.
-
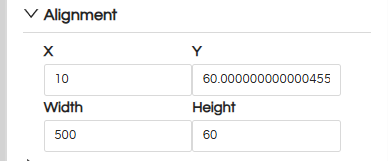
Alignment
Purpose: Controls the table alignment
- X-position: Distance from the left side in pixels
- Y-position: Distance from the top in pixels
- Width: Width of the table component in pixels
- Height: Height of the table component in pixels
-
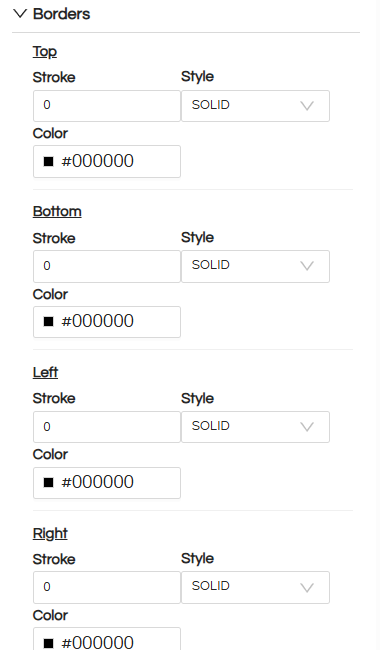
Borders
Purpose: Configure various properties of the border, like border style, width and color.
-
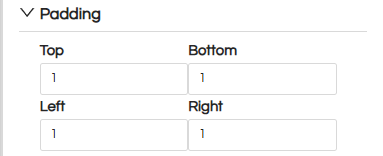
Padding
Purpose: We can configure padding for table. Data will appear in the cell after applying that much padding.
-
Table Configuration
Purpose: Advanced table settings.
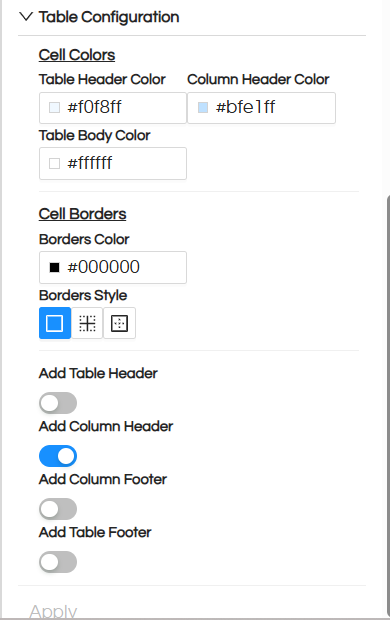
Cell Colors
- Table Header Color controls the color of the top header row
- Column Header Color controls the color of column names
- Table Body Color controls the color of data cells
Cell Borders
- Borders Color controls the color of table lines
- Borders Style controls where borders appear such as all cells rows only or columns only
Headers and Footers
- Add Table Header shows or hides the table header row
- Add Column Header shows or hides column names
- Add Column Footer shows or hides the totals row
- Add Table Footer shows or hides the bottom footer
Now you can decide which all columns will appear in the table.
For doing that use “Select required fields for Table Columns” and via drop down you can select the fields. The sequence in which we click, it will appear in that sequence.
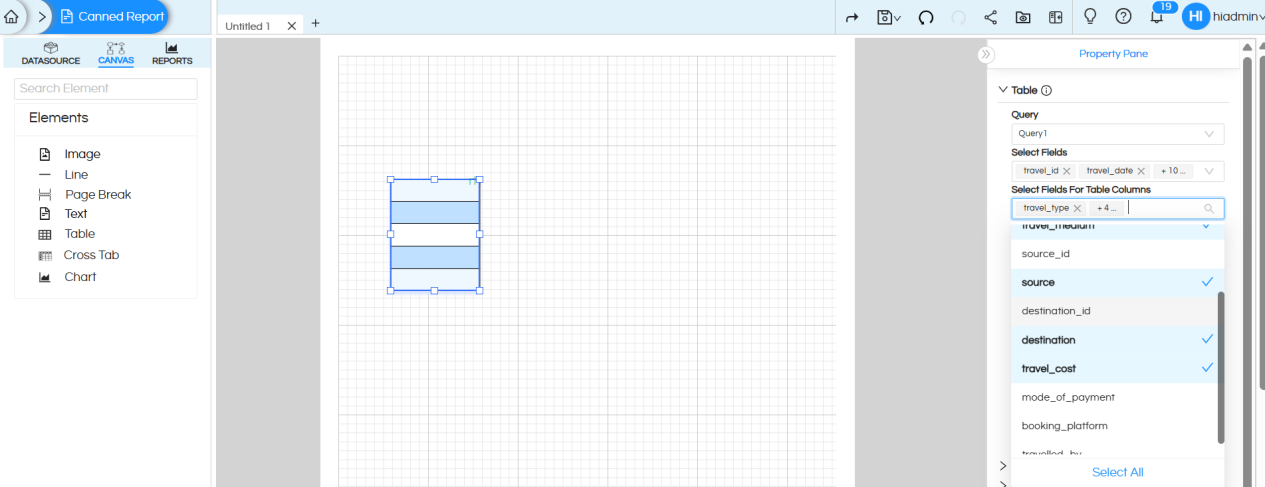
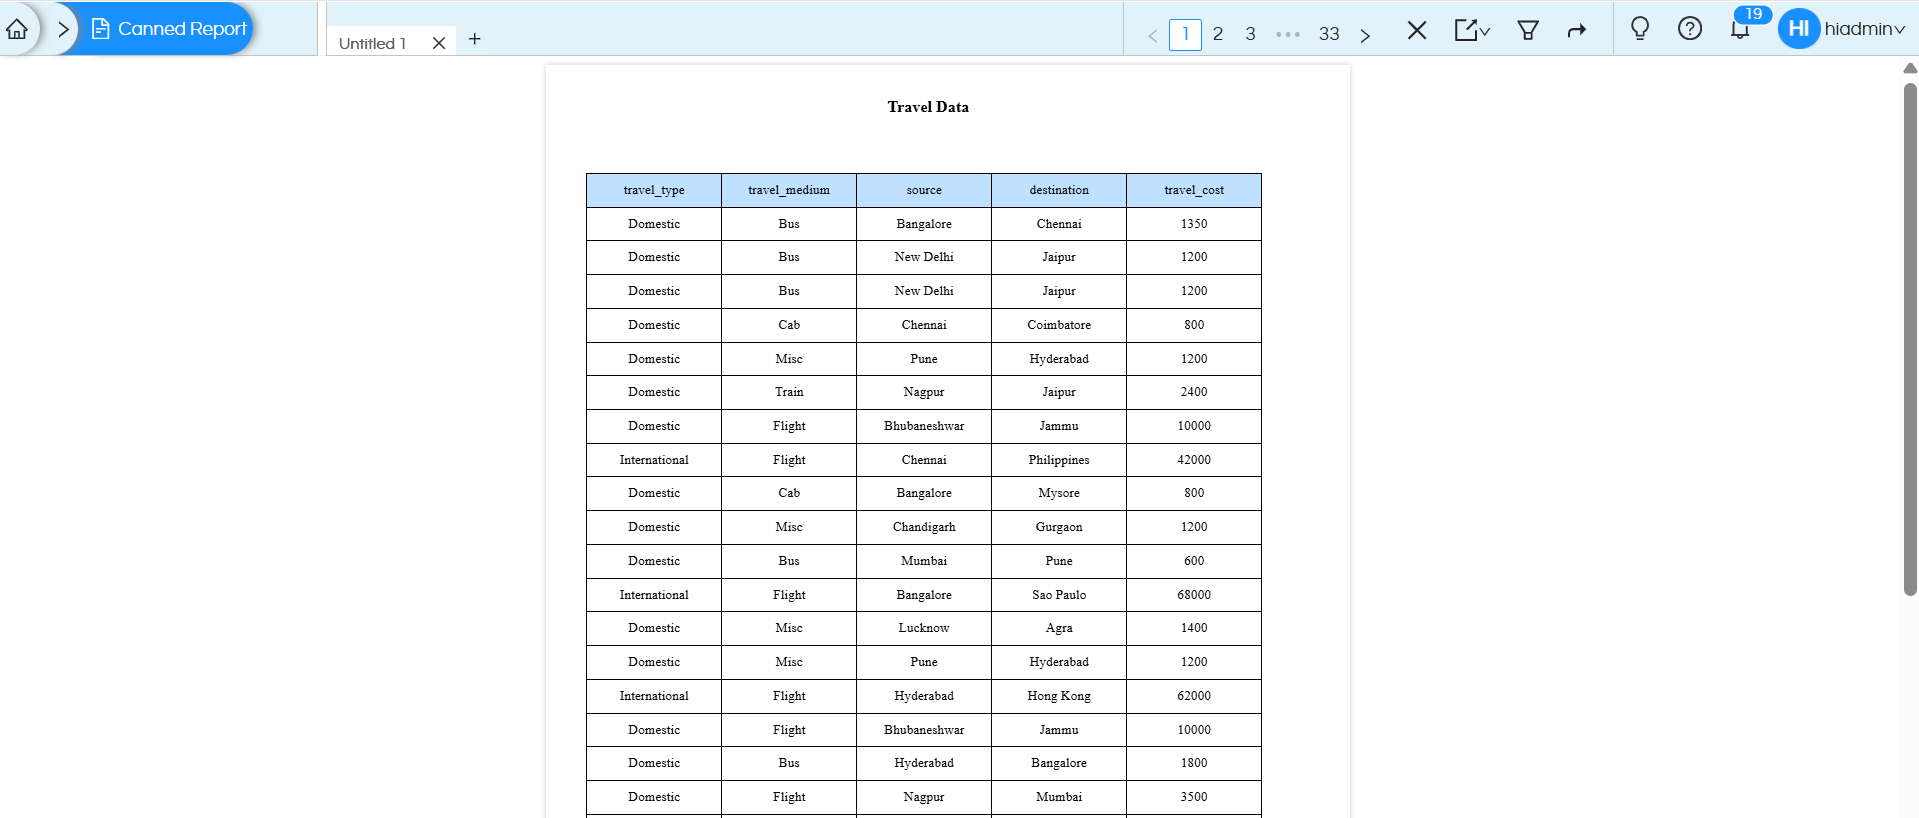
After selecting the fields, the table will appear like this.
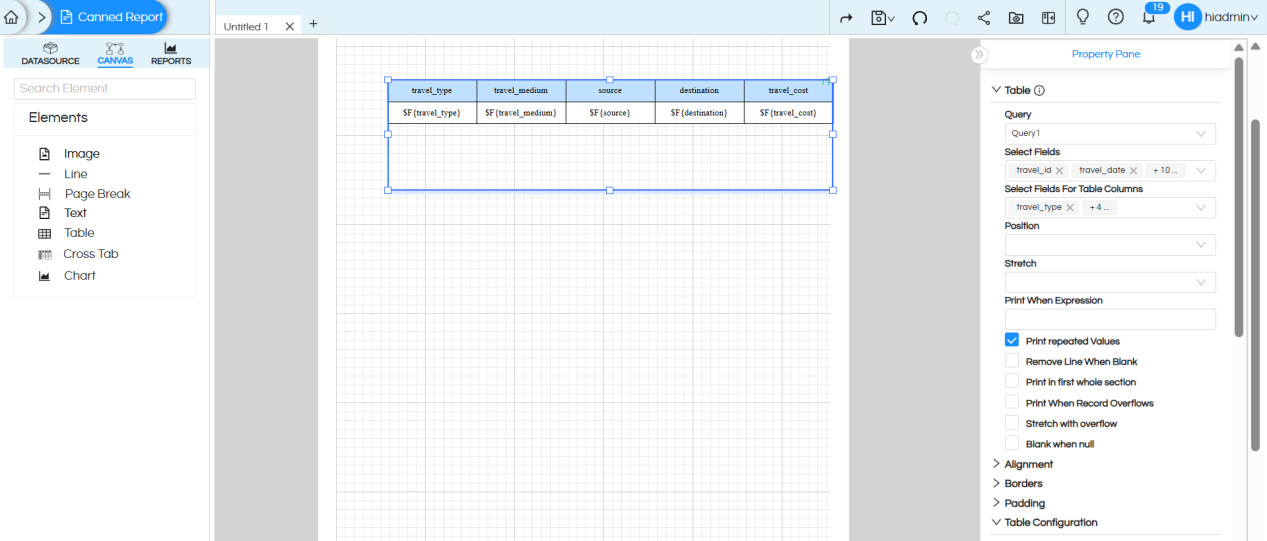
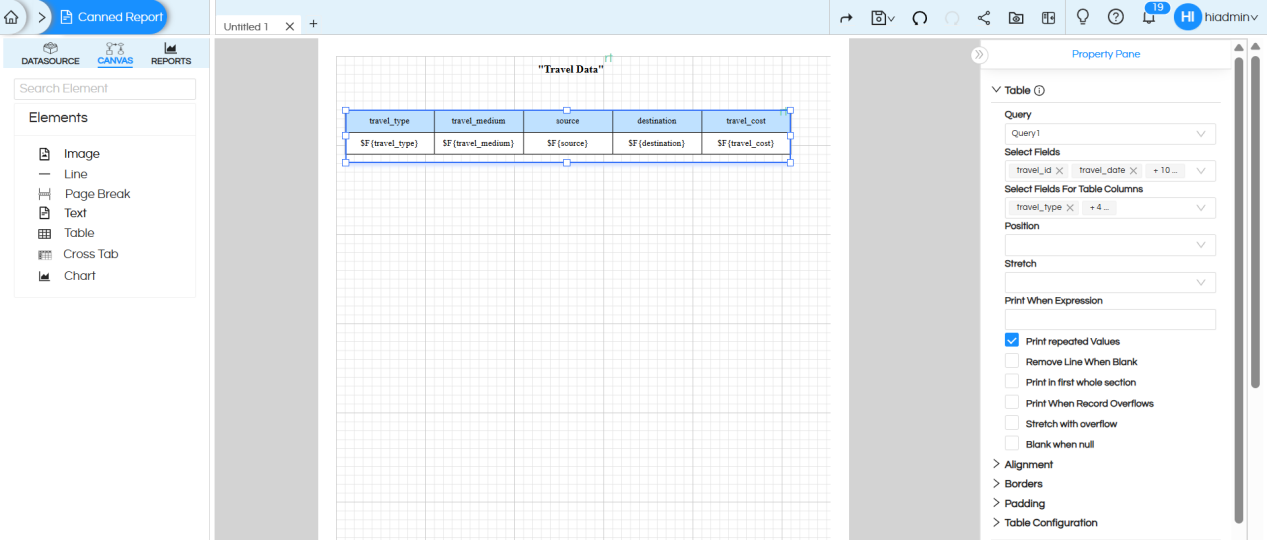
Other components like header, footer, border etc can be enabled. disabled and used as per your design requirement. In this current blog example we have disabled Table header, Column header, Table footer from Table Configuration. Then click on Apply
Adjust the table in the canvas properly
With the release of Helical Insight 6.2.1.1001, the Table Component in Canned Report has been enhanced with a new Table Outline Panel that provides a more structured and user-friendly report designing experience. The upgraded interface simplifies report creation using drag-and-drop functionality and offers better control over datasets, fields, calculations, grouping, variables, and table structure management.
8. Individual cell level properties
Once a table is created, we may want to specify the individual cell level properties like thousand sepeator in some cell, alignment, bold, font size etc. To apply these properties:
- Click on the Table component to open the table editor.
- Select the individual cell you want to customize.
- Configure the required formatting and styling properties from the property panel.
Click here to read more.
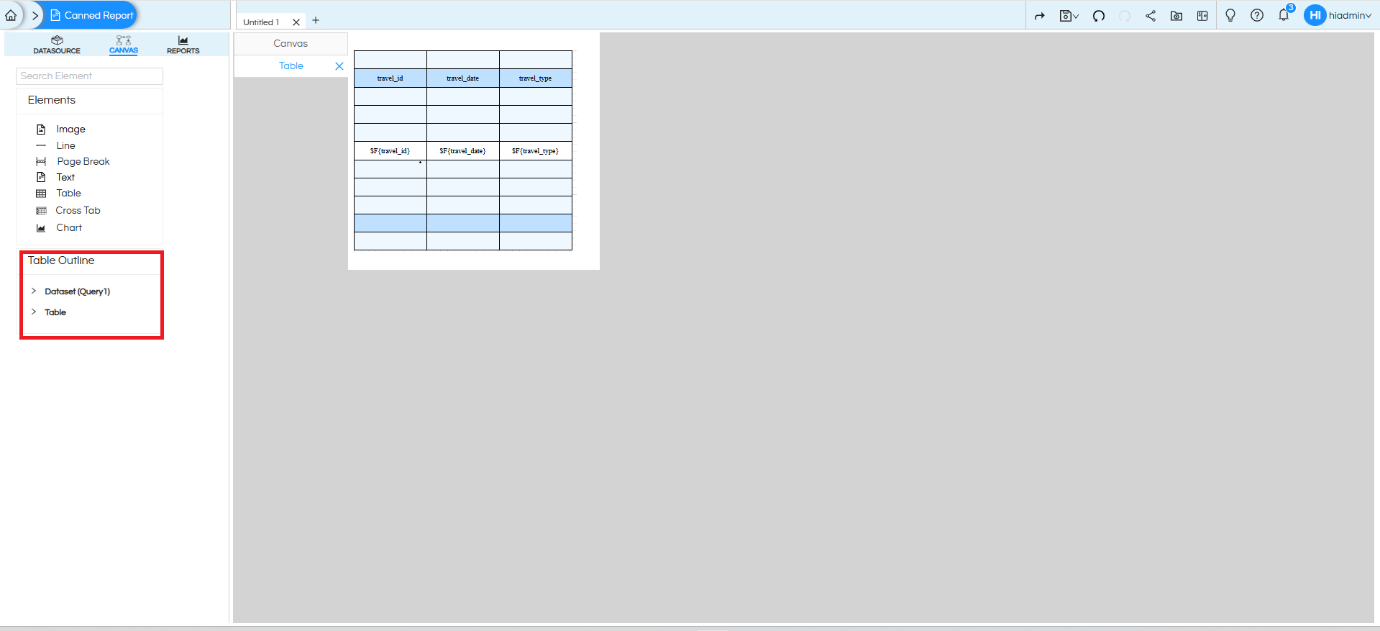
9. When we have clicked on Table, there are other configuration options which are explained below for doing things like adding fields, parameters, deleting fields, formatting, grouping etc.
Table Outline Panel
1. Dataset
The newly introduced Table Outline Panel appears on the left side of the report designer.
This Contains:
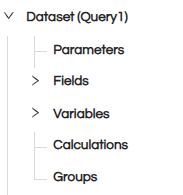
Parameters
Parameters are used to create dynamic and interactive reports. They mainly act as filters and allow users to pass values during report execution.
Creating and Configuring Parameters
To create a new parameter specific to this Table component, expand the Dataset in the Table Outline panel, right-click on Parameters, and select Create Parameter.
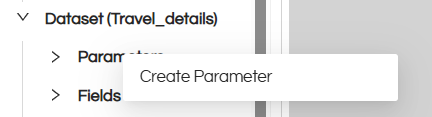
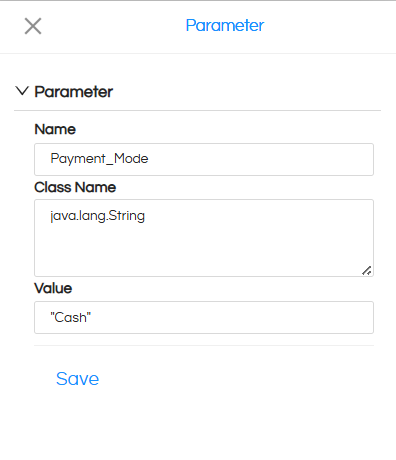
Once the parameter is created, a configuration panel will appear on the right side of the screen. The following properties can be configured:
- Name: Specifies the name of the parameter. This name is used in the WHERE clause of the table query.
- Class Name: Specifies the data type of the parameter. You can select the required type, such as String, Integer, Float, Double, Long, Short, or Big Decimal.
- Value: Specifies the default value that should be passed to the parameter. The value must be placed in ‘’ (or it could also be specific to the SQL syntax requirement of the DB you are connecting to how it accepts data for filters).
After entering the required details, click Save to create the parameter.
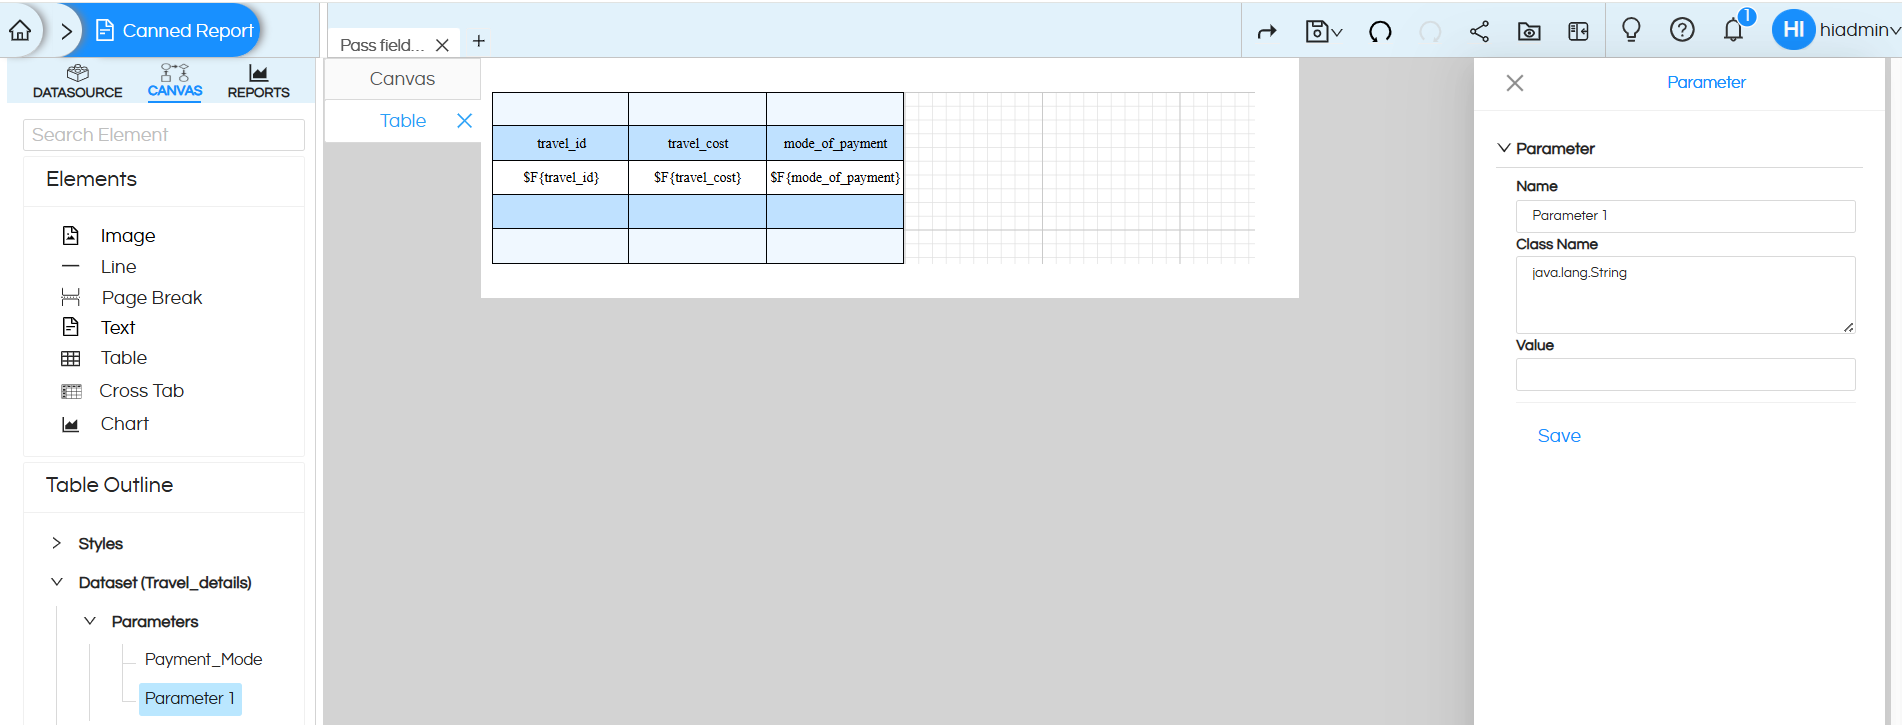
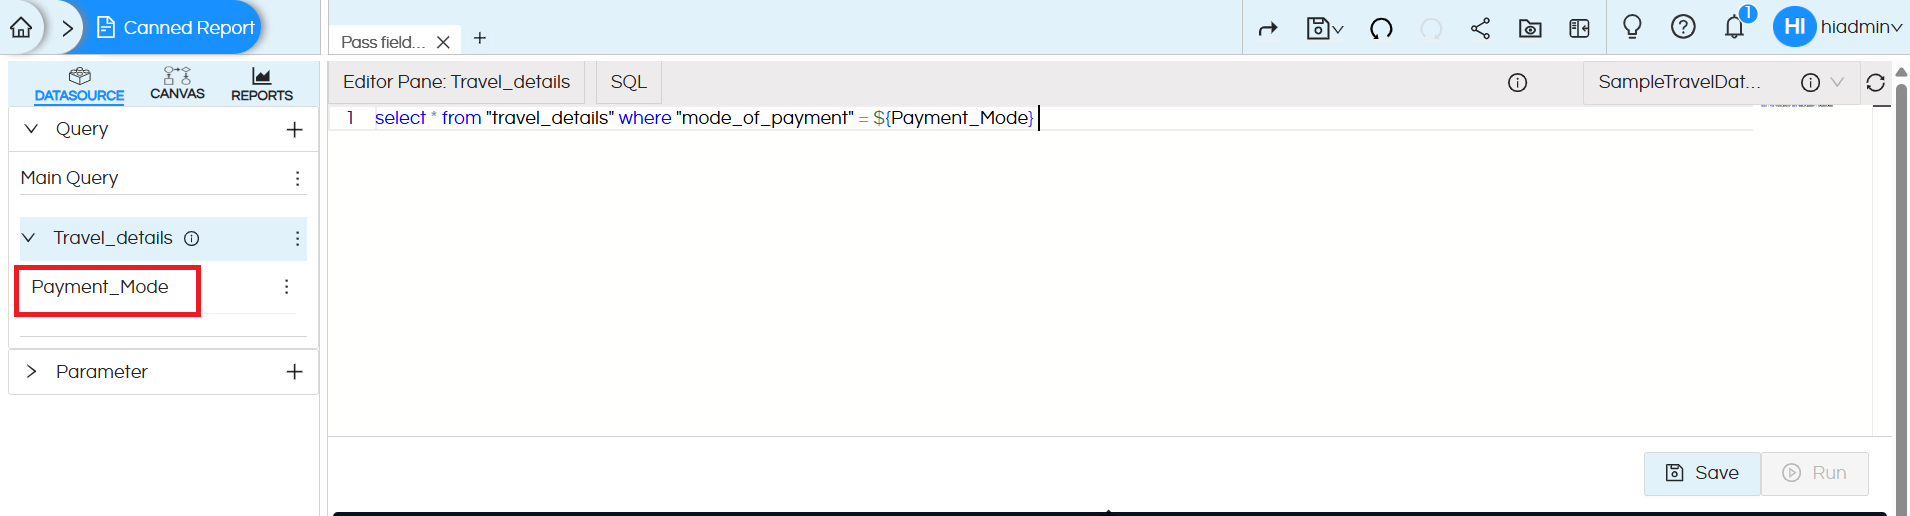
After creating a parameter, it becomes available within the selected dataset and is displayed in the Query panel as shown in above image.
To use the parameter in the Table query, add it to the query by referencing the same parameter name that was specified during parameter creation.
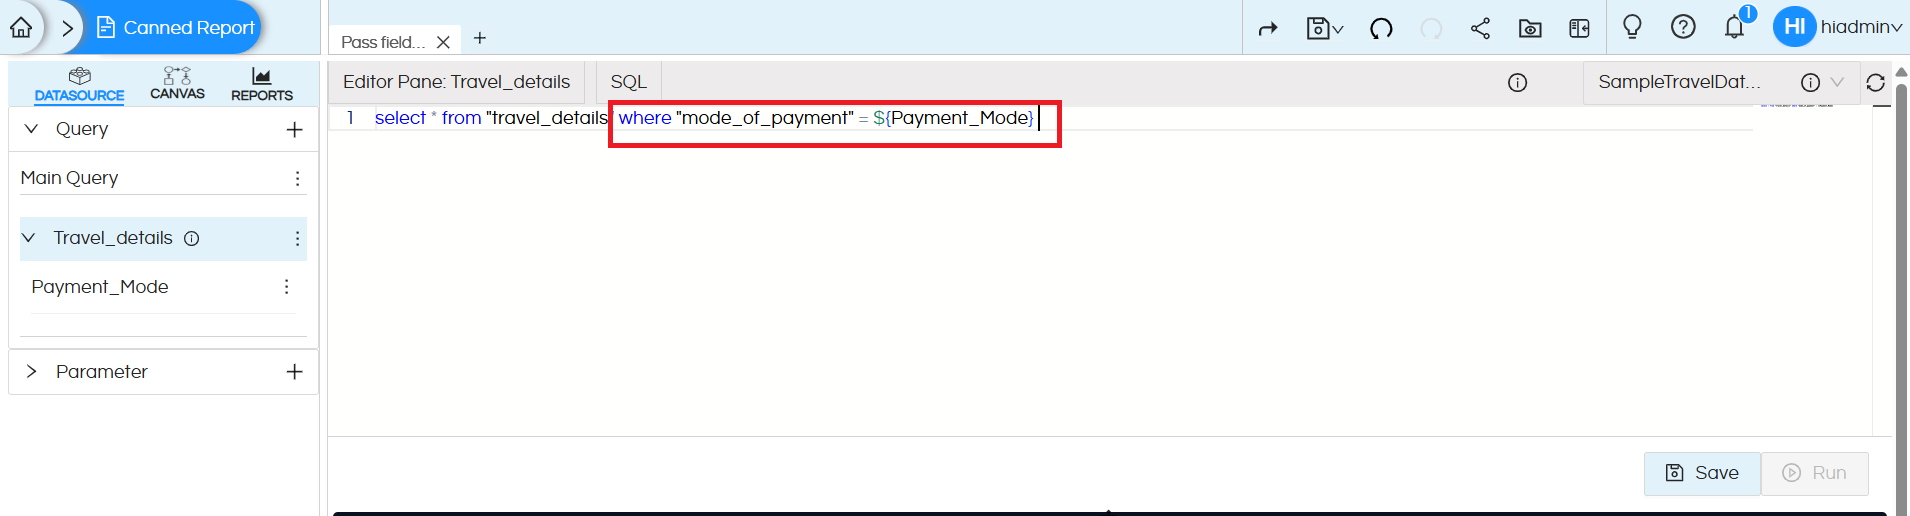
Parameters are typically used in the WHERE clause to filter the dataset dynamically at runtime.
For example, if a parameter named Payment_Mode has been created, it can be referenced in the query as follows:
SELECT *
FROM "travel_details"
WHERE "mode_of_payment" = ${Payment_Mode}
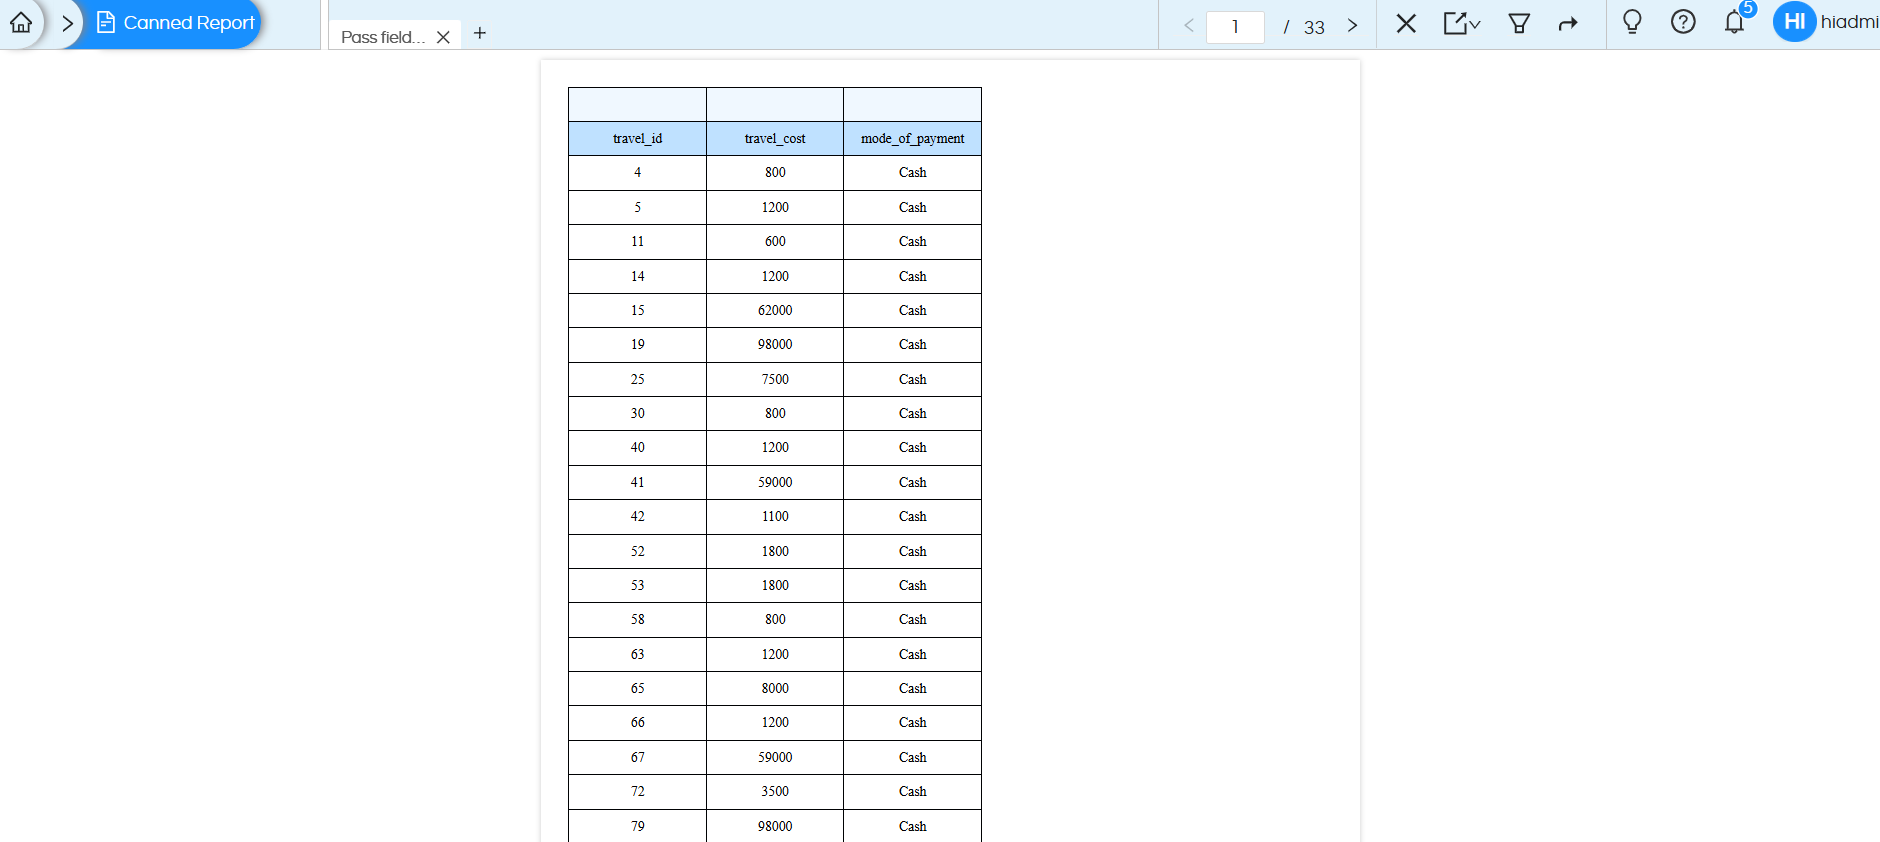
In this example, Payment_Mode is used to filter records based on the value passed to the parameter. During report execution, the parameter value is evaluated and substituted into the query, and only the matching records are returned.
Configuring Query and Parameter Mapping for a Table Component
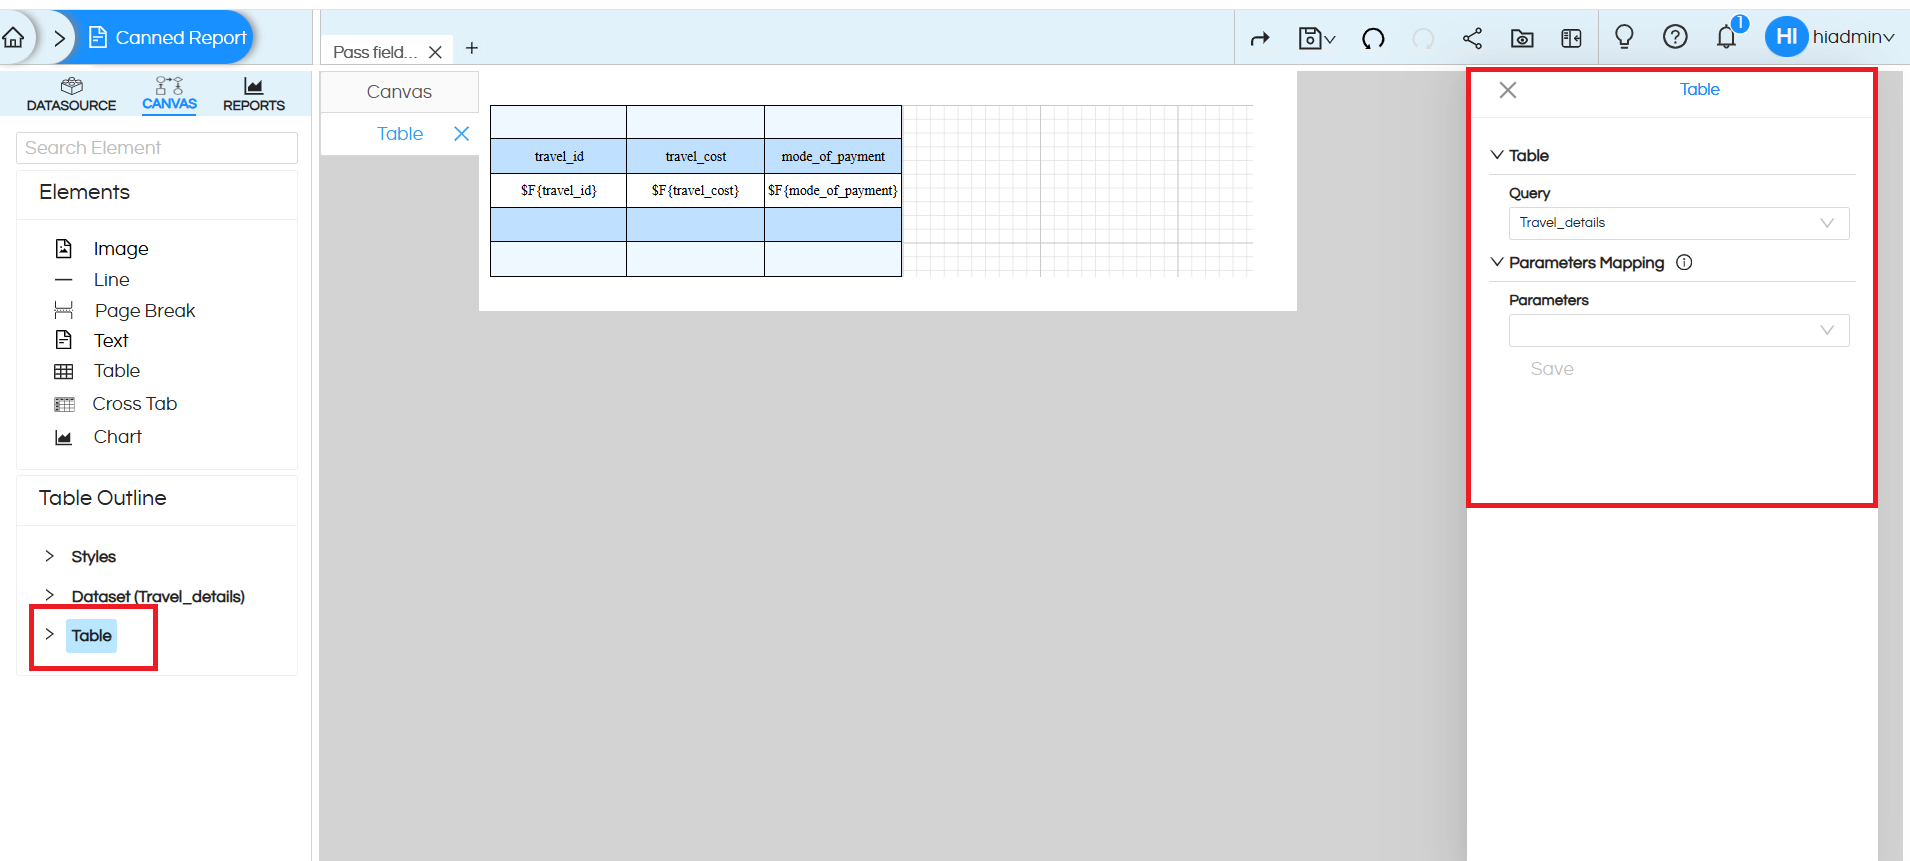
After creating a Table level parameter, select the Table option from the Table Outline panel on the left side. The table configuration panel will then be displayed on the right side of the screen.
Query Selection
The Query option allows you to select the dataset that will be used by the table component. If multiple datasets are available in the report, you can choose the required dataset from the drop-down list.
This option is useful when applying filters using parameters from a different dataset that is being used within the components.
Parameter Mapping
The Parameter Mapping section is used to pass values to the parameters created in the dataset.
The following options are available:
- Parameters: Select the parameter that you want to configure from the drop-down list. The list displays all parameters created for the selected dataset.
- Expression: Maps a value from the current report context to the selected parameter. The mapped value is evaluated at runtime and overrides the parameter’s default value.
The Expression field allows you to map values from:
- Fields: Dataset fields that are available in the current report.
- Variables: Variables created within the report.
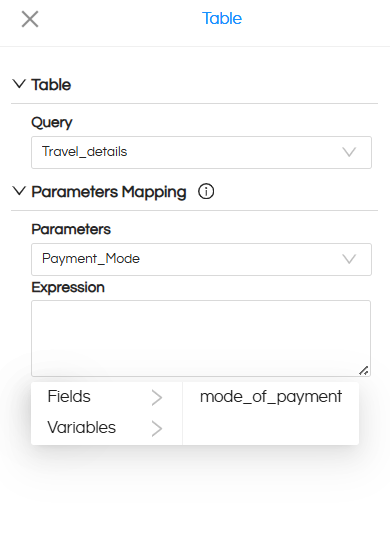
After configuring the parameter mapping, click Save to apply the changes. This ensures that the selected parameter receives the appropriate value when the report is executed.
Using Parameter Mapping with Multiple Tables and Datasets
After configuring the parameter mapping, the report generates a separate table for each value returned by the source query. In this example, individual tables are created for different Payment_Mode values, such as Net Banking, Credit, and Cash.
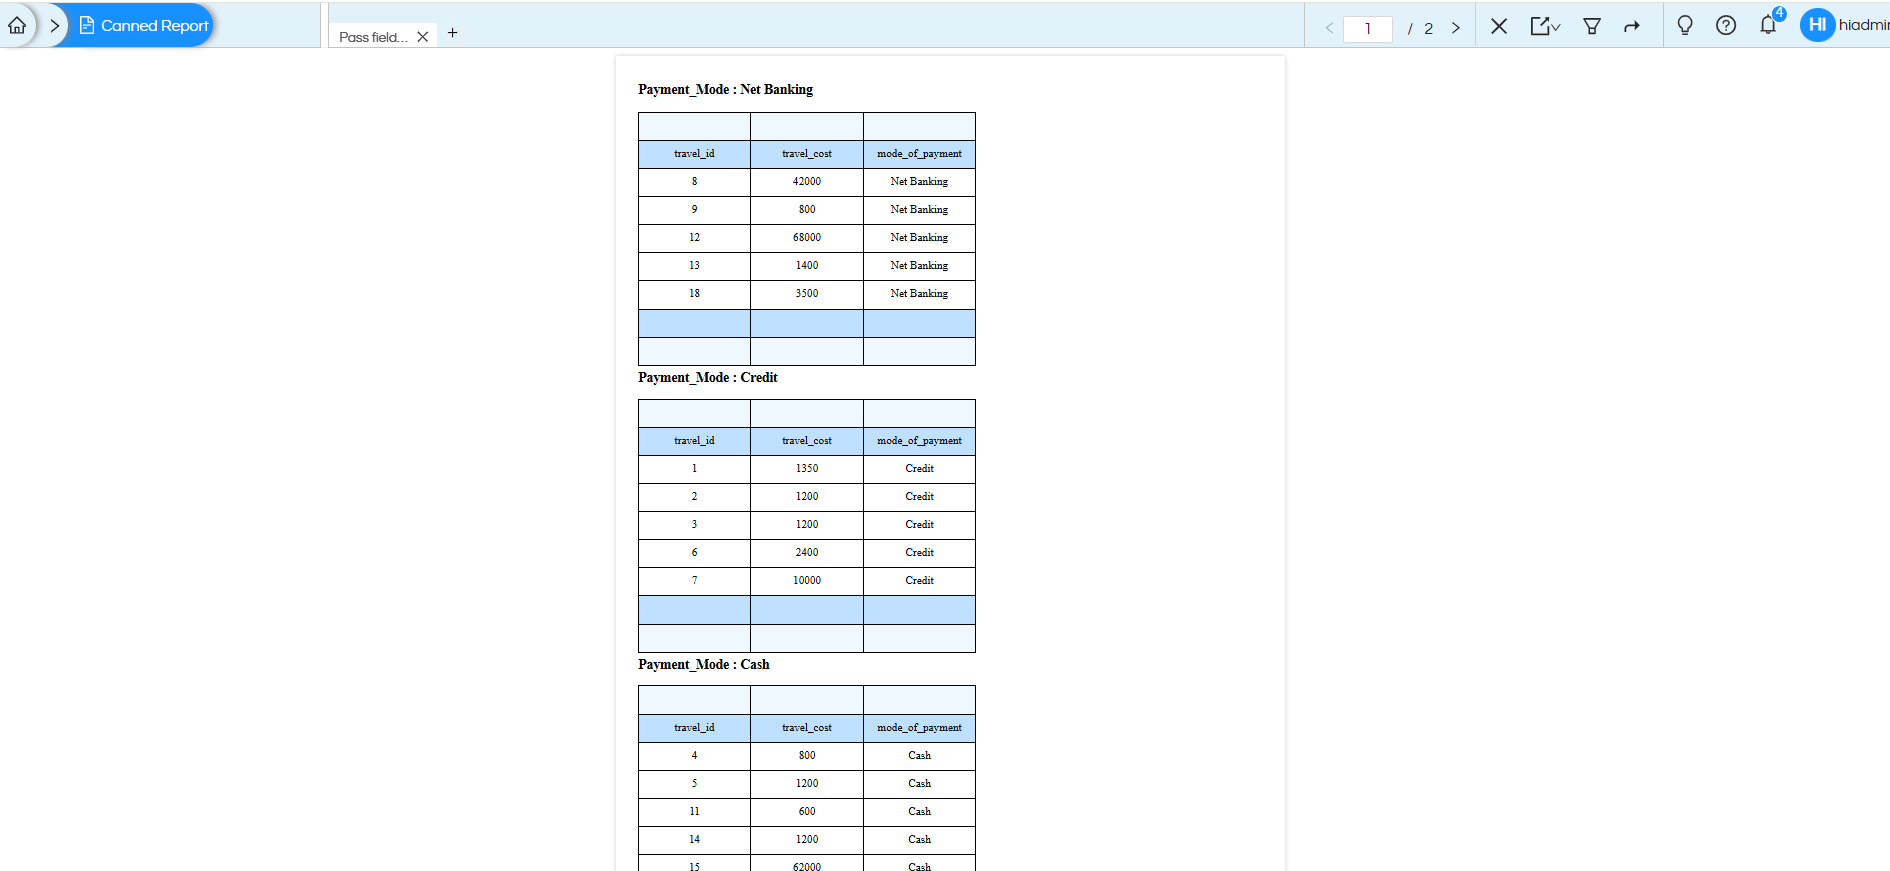
The parameter value used to filter the table is obtained from another query through parameter mapping. At runtime, the selected field value is passed to the target parameter and applied to the table query.
Fields
Fields represent the columns returned from the dataset or SQL query. All query output columns automatically appear under the Fields section in the Table Outline.
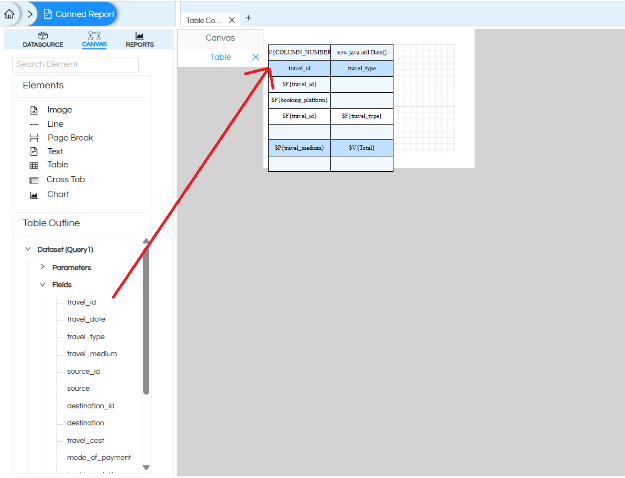
Using drag-and-drop functionality, fields can be directly placed into the any of the components of table and accordingly the table report gets created:
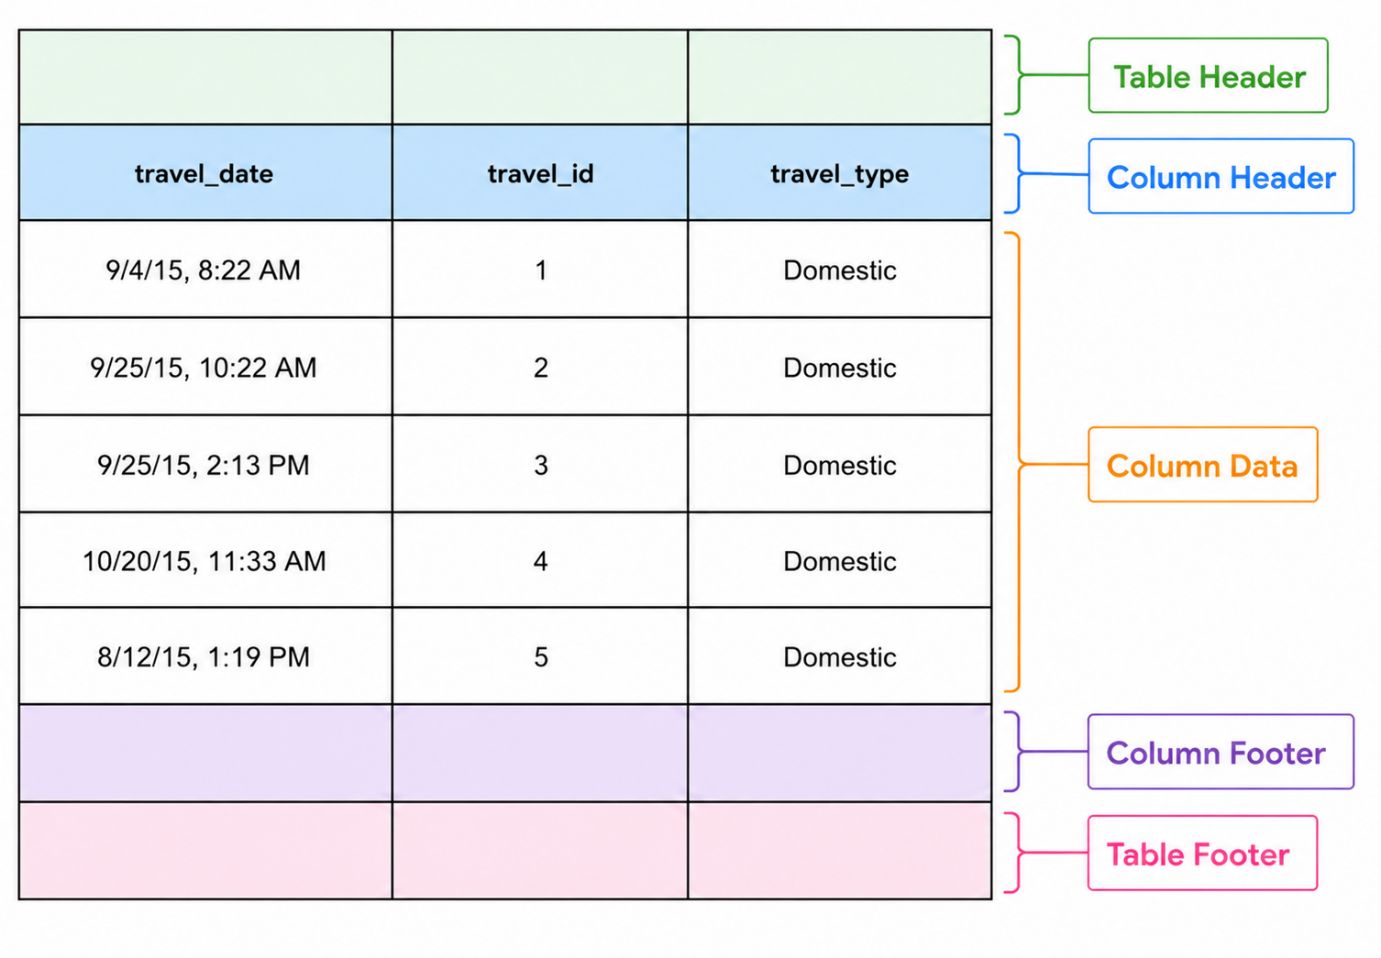
Below is the definition of various components of a table
Users can also right-click on fields/calculations to create fields directly from the Table Outline
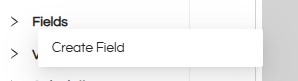
Note: Fields can only be created from the fields available in the selected query. This option is useful when a field was missed while designing the canvas, allowing it to be created later and added directly to the table.
Variables
The upgraded Table Component also provides access to variables that can be directly used inside reports. These variables can also be dragged into any component of table like header, footer etc.
To know more about the variables refer the below blog: https://www.helicalinsight.com/quick-functions-in-canned-reports/
Calculations
The new Table Outline also includes a dedicated Calculations section.
This section allows users to create custom calculated fields dynamically without modifying the original dataset.
Calculated fields can then be dragged and used anywhere inside the report component.
Users can also right-click on calculations to create groups directly from calculated fields for easier summarization and grouping.
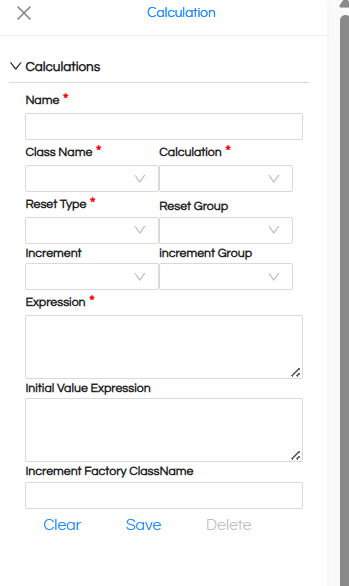
For detailed information on usage of custom calculations refer here:
https://www.helicalinsight.com/adding-custom-calculations-in-helical-canned-report
Groups
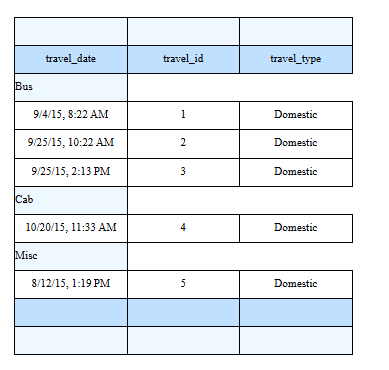
Within table, we can have groups allowing to show data further categorized. Like in the below image we have a 3 column table which is grouped according to travel_medium. Hence the data appears for first travel_medium like bus, then next so on and so forth.
In order to create Group, Open the Outline Panel.
- Locate the required Group Component.
- Right click on it and select “Create Group”
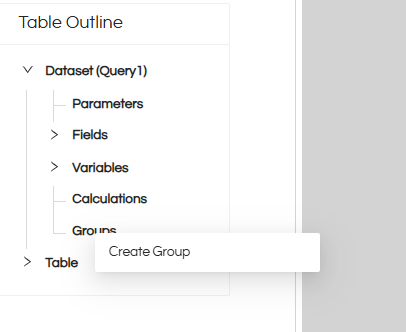
3. It will show group created with default name as “Group 1” etc.
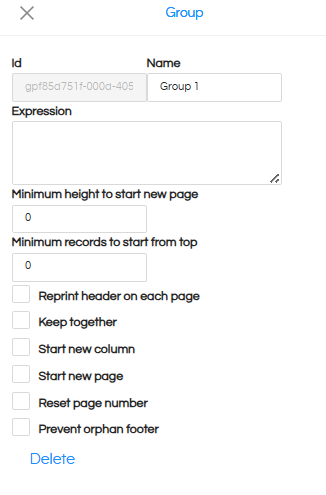
4. After clicking on Group 1, a UI like below will appear with further customization options.
After creating the group we will get new options under table
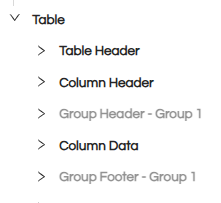
Right click on them and you can create/delete a row/column etc along with their position in the respective created Group/header/footer/data.
Current Limitation
Currently, groups created directly from the Table Outline are automatically named as: Group 1, Group 2, Group 3…etc
These group names cannot be renamed at the moment.
However, if groups are created directly from the canvas area, the group name is automatically displayed based on the selected field name.
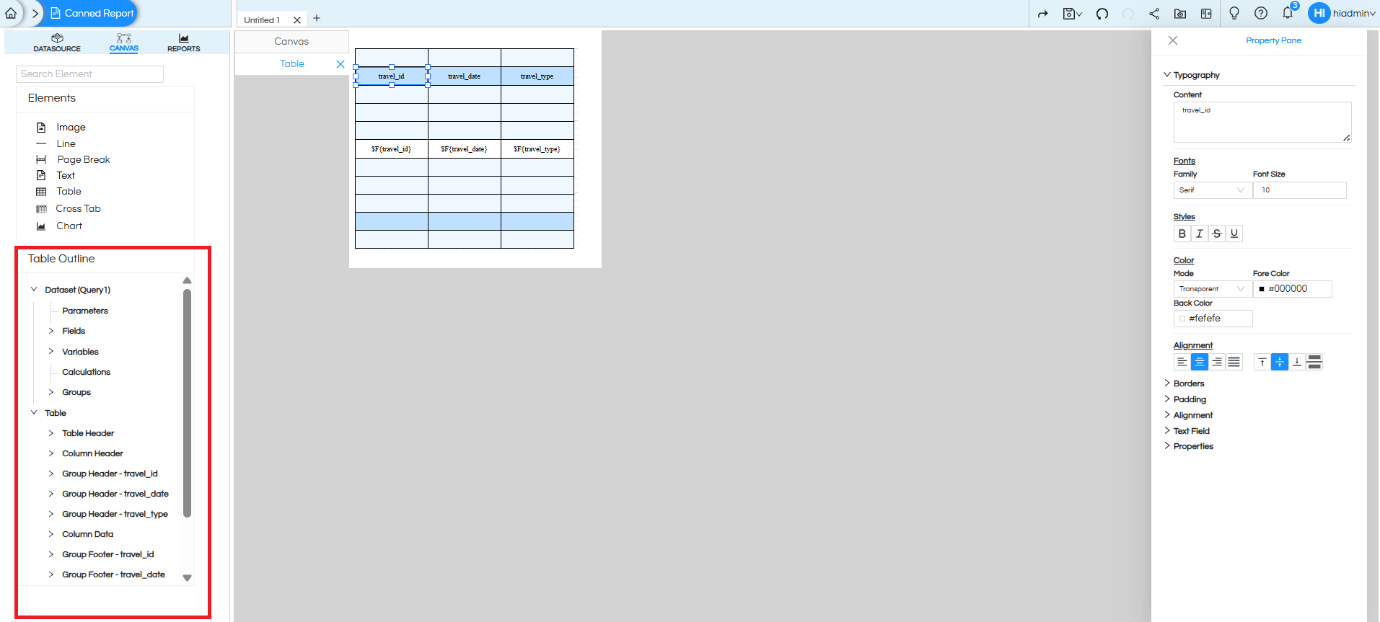
Table Sections
Table Component organizes reports into multiple sections for better formatting and management as shown in the above image
Column Management Options
Version 6.2.1.1001 onward introduces improved column management through the Table Outline. Right-clicking on a column provides options such as: Create Column At The Beginning / End, Delete Column, Delete Cell, Select All Cells, Select All Elements, Undo ,Redo
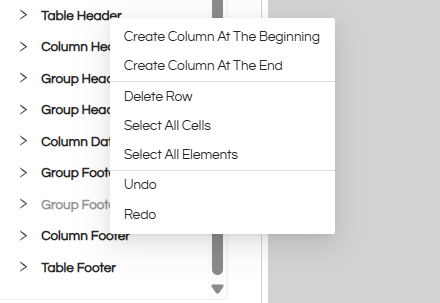
Managing Table Bands
The upgraded Table Component allows users to modify table structures even after the initial configuration.
Users can enable or disable table bands such as Table Header, Table Footer, Column Header, Column Footer, Group Header, Group Footer (image and steps)
Re-Enabling Disabled Table Bands
Previously disabled table bands can be re-enabled directly from the Outline Panel without recreating the table.
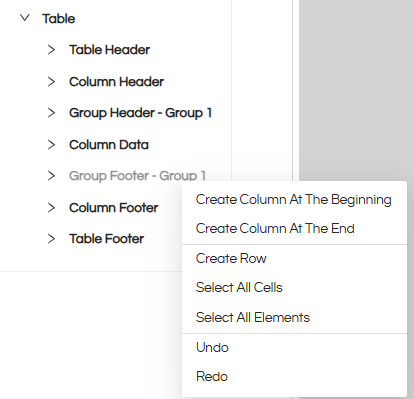
Steps
- Open the Outline Panel.
- Locate the required Table Component.
- Right-click on the required section only if it is disable you can see the Create row option.
Removing Table Bands
To remove a table band:
- Right-click on the required band. If it is enabled you can then see the delete row option.
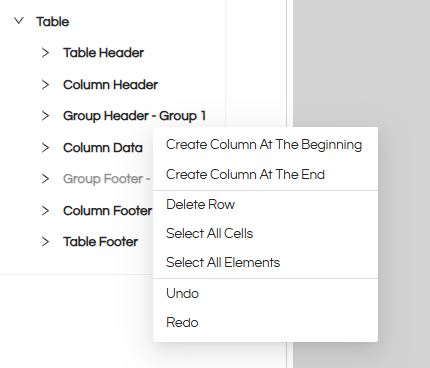
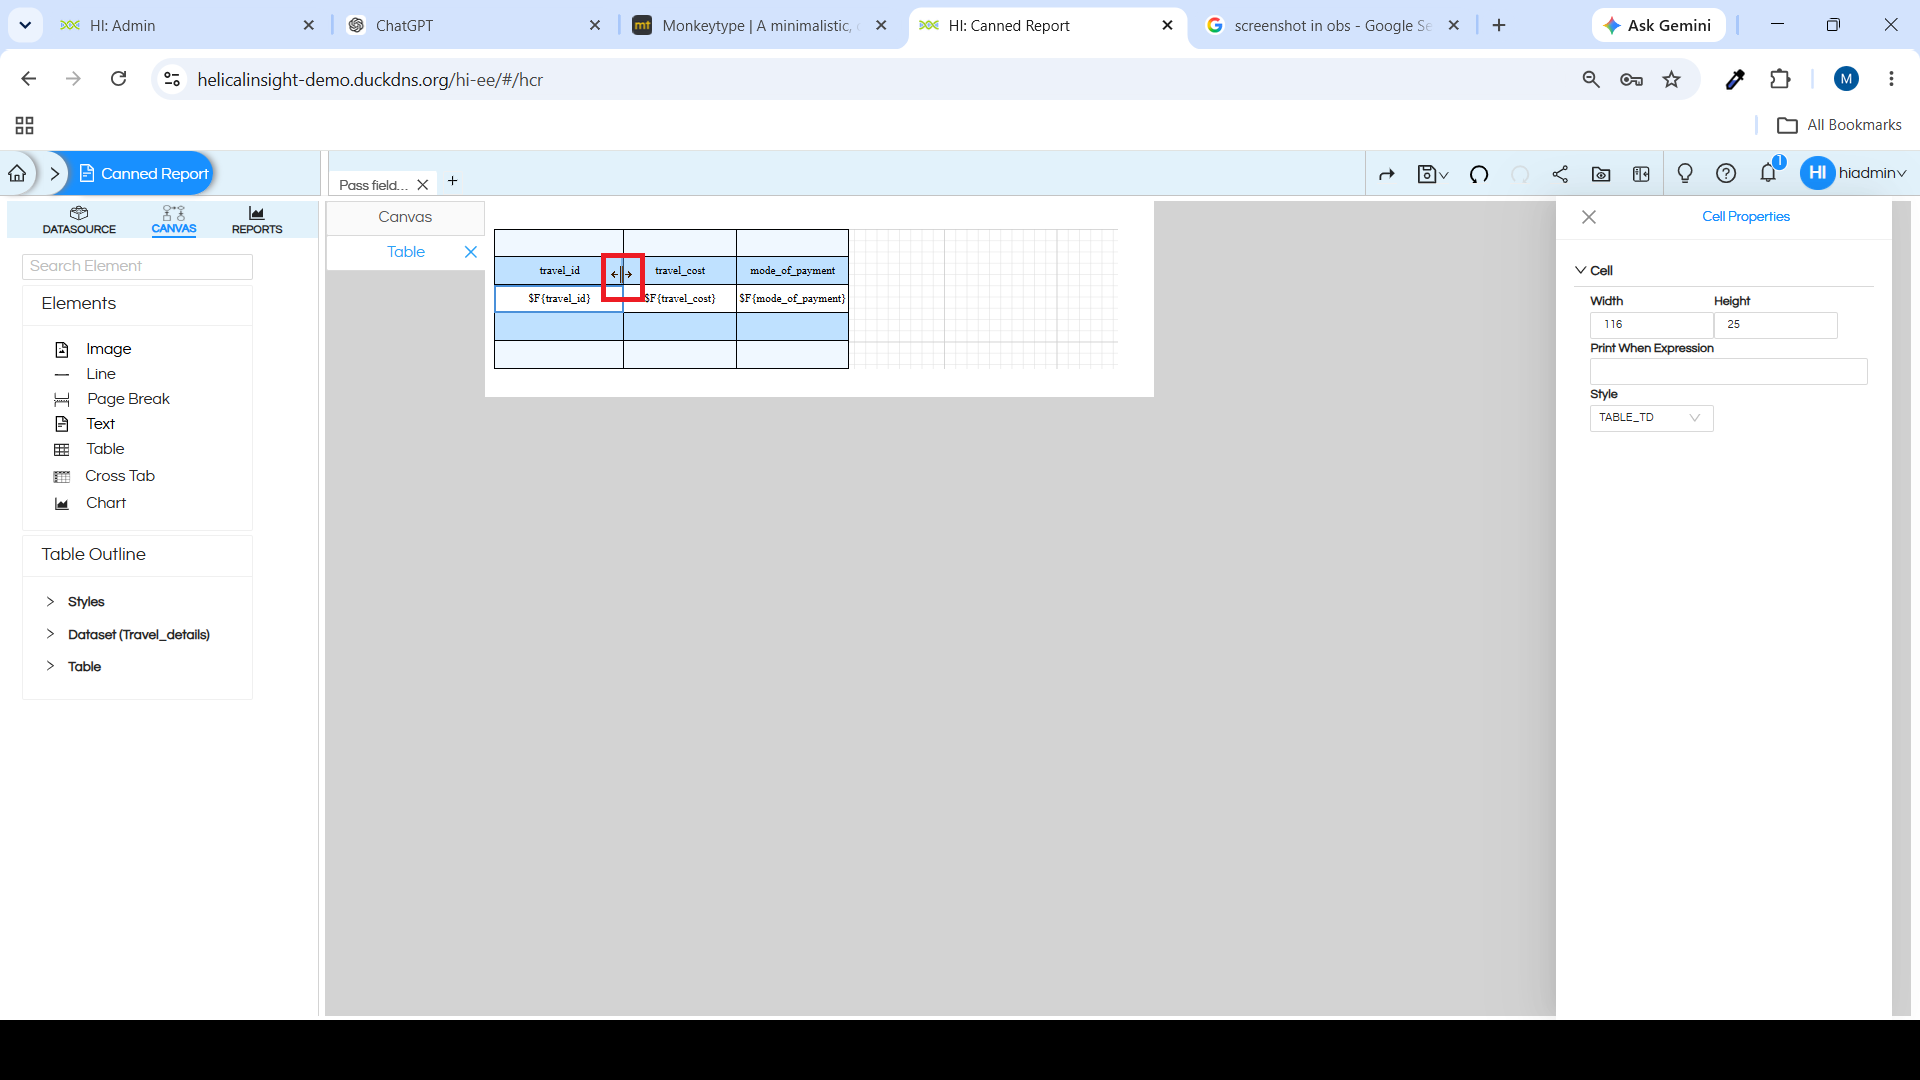
Adjusting Table Width
When you hover over the inner borders of a table, the cursor changes to a resize cursor. You can then click and drag the border to adjust the width of the corresponding column.
Styles
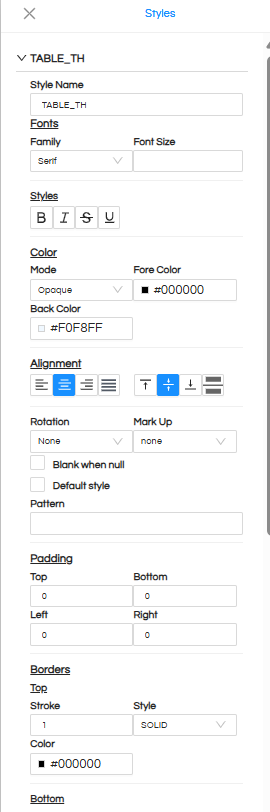
Styles allow you to control the formatting and appearance of the different elements within a table. This includes properties such as headers, detail cells, and footers, along with visual attributes like fonts, colors, borders, and alignment. Instead of formatting each cell individually, a style can be applied to a table element so that all cells of that type share consistent formatting.
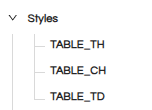
The Styles section in the Table Outline Panel lists the available style categories:
- TABLE_TH – Defines the style applied to the table header cells.
- TABLE_CH – Defines the style applied to the column header cells.
- TABLE_TD – Defines the style applied to the detail (data) cells of the table.
Adding Multiple tables in the report :
Each Table component requires a dedicated query. A single query can be bound to only one table, therefore, a separate SQL query must be created for every additional table used in the report.
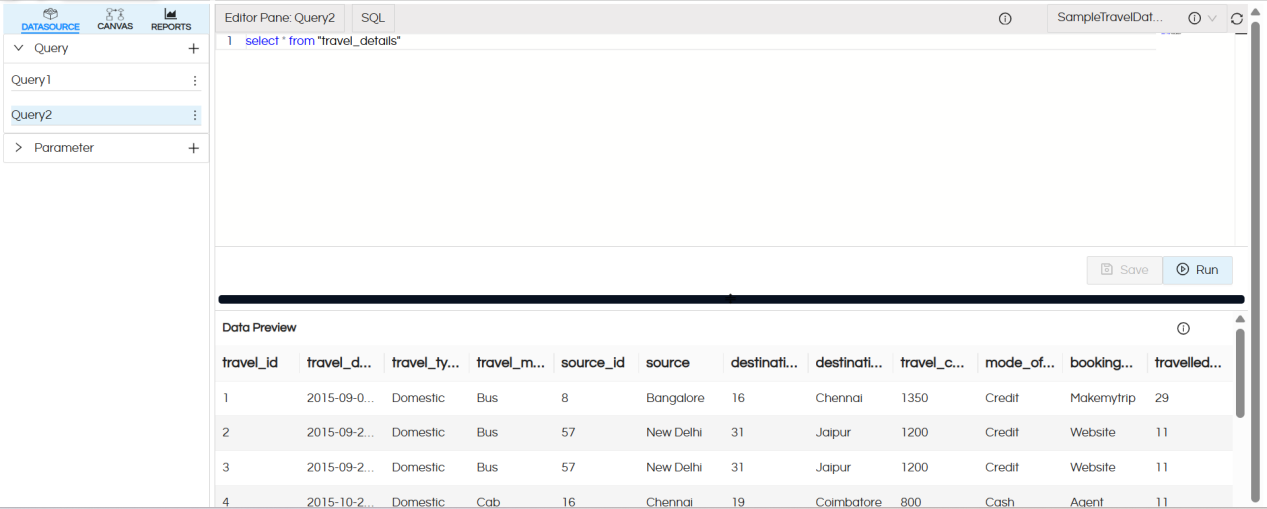
Just as we create Table 1, we can create Table 2 in the same way and align it properly on the canvas.
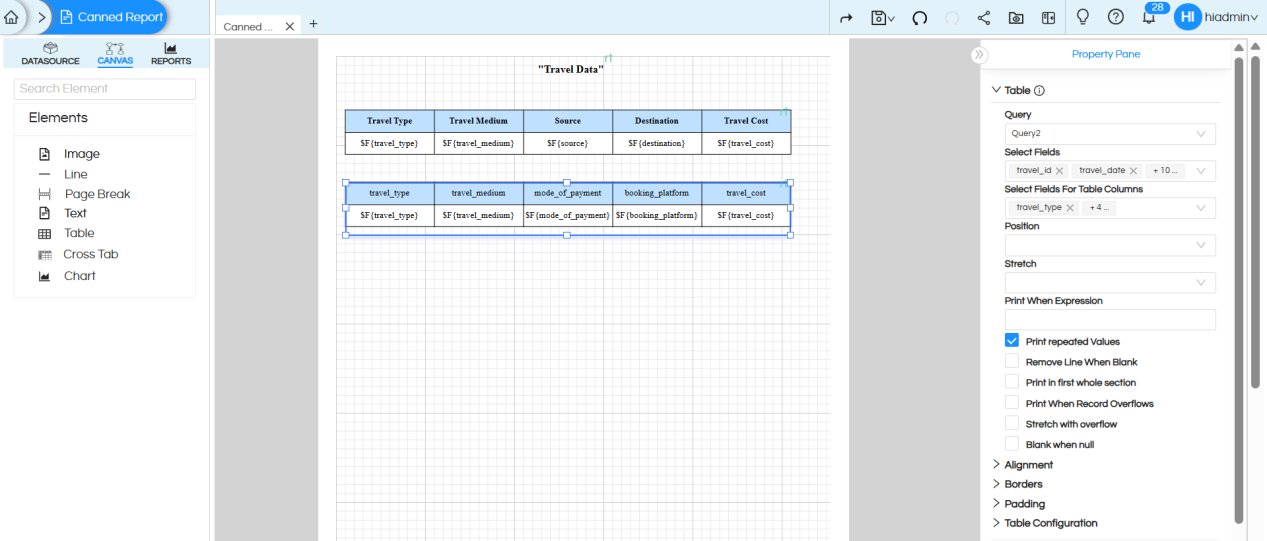
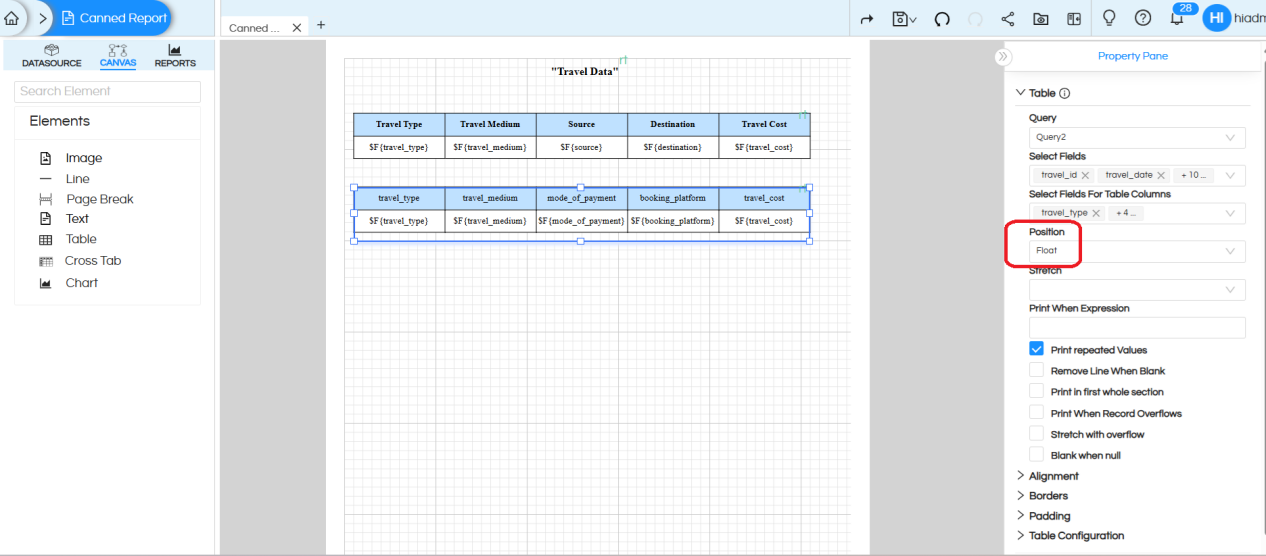
Important table properties that should be applied to avoid overlap issues:
We should apply Position > Float for table 2
We can see 2nd page has stared at page 33.
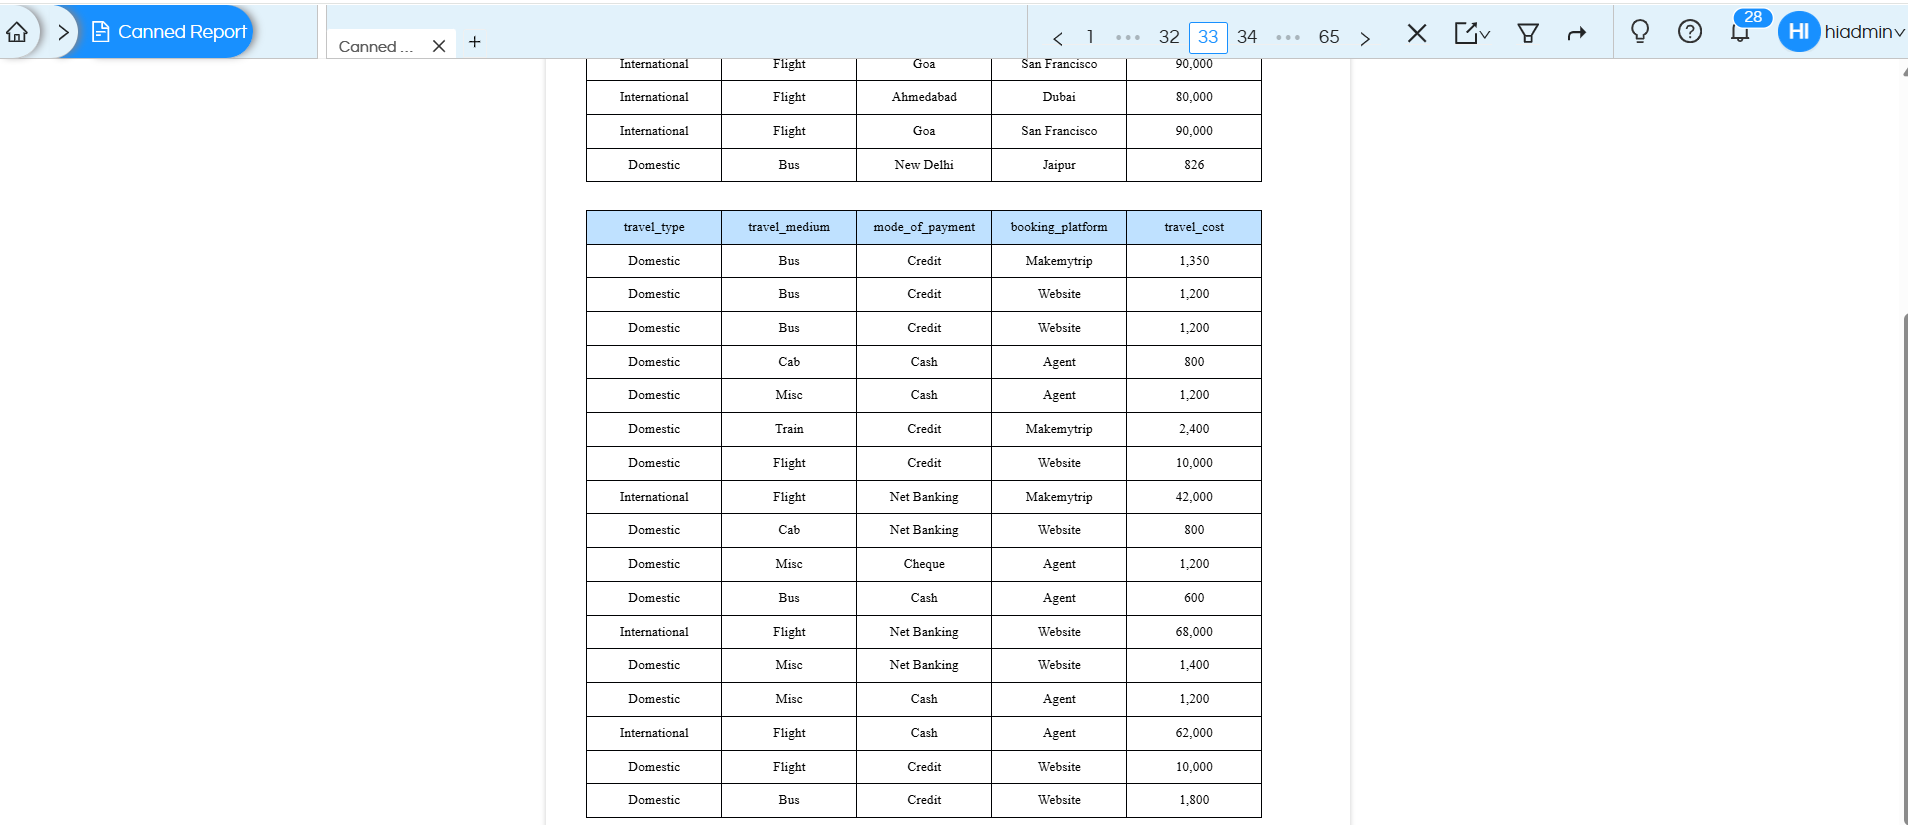
Note : When working with multiple tables, apply the Position Float property starting from the second table onward so that when the first table ends then this table will start that’s why position is floating. If any text fields are placed between tables, the Position Float property should also be applied to those text fields.
If table overlap issues still persist, enable the Repeat by Summary option to ensure proper rendering.
NOTE2 : In case if you put many columns in your table, the width of the page might not be sufficient and hence even if it might appear in the browser when exported in PDF format it will not appear. Hence, please select the page size accordingly. Read here.
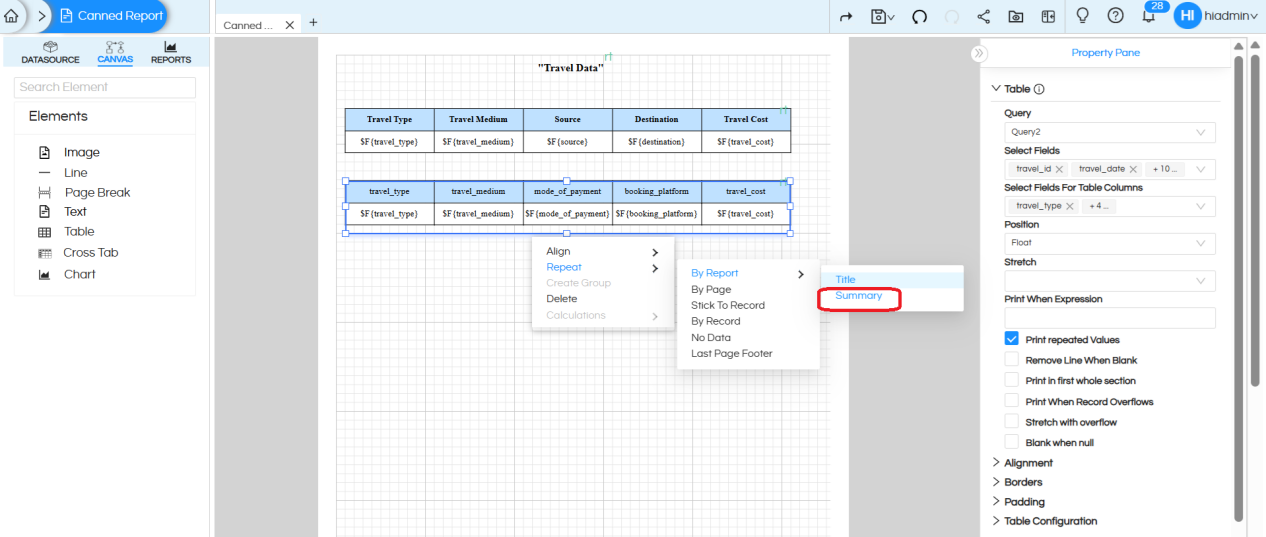
Table with Parameters :
There is no separate or additional process required to add parameters for an individual table or for multiple tables.
Parameters are created once and can be mapped to multiple queries, allowing the selected parameter values to be applied to their respective tables.
Refer to the documentation below for detailed steps on adding and configuring parameters. https://www.helicalinsight.com/input-parameters-filter-types-canned-report/
Reach out on support@helicalinsight.com in case of any more questions.
