
Introduction
Filters in Helical Insight allow users to narrow down the data displayed in a report or visualization based on specific conditions. They help users focus on the information they need without creating separate visualizations for different requirements.
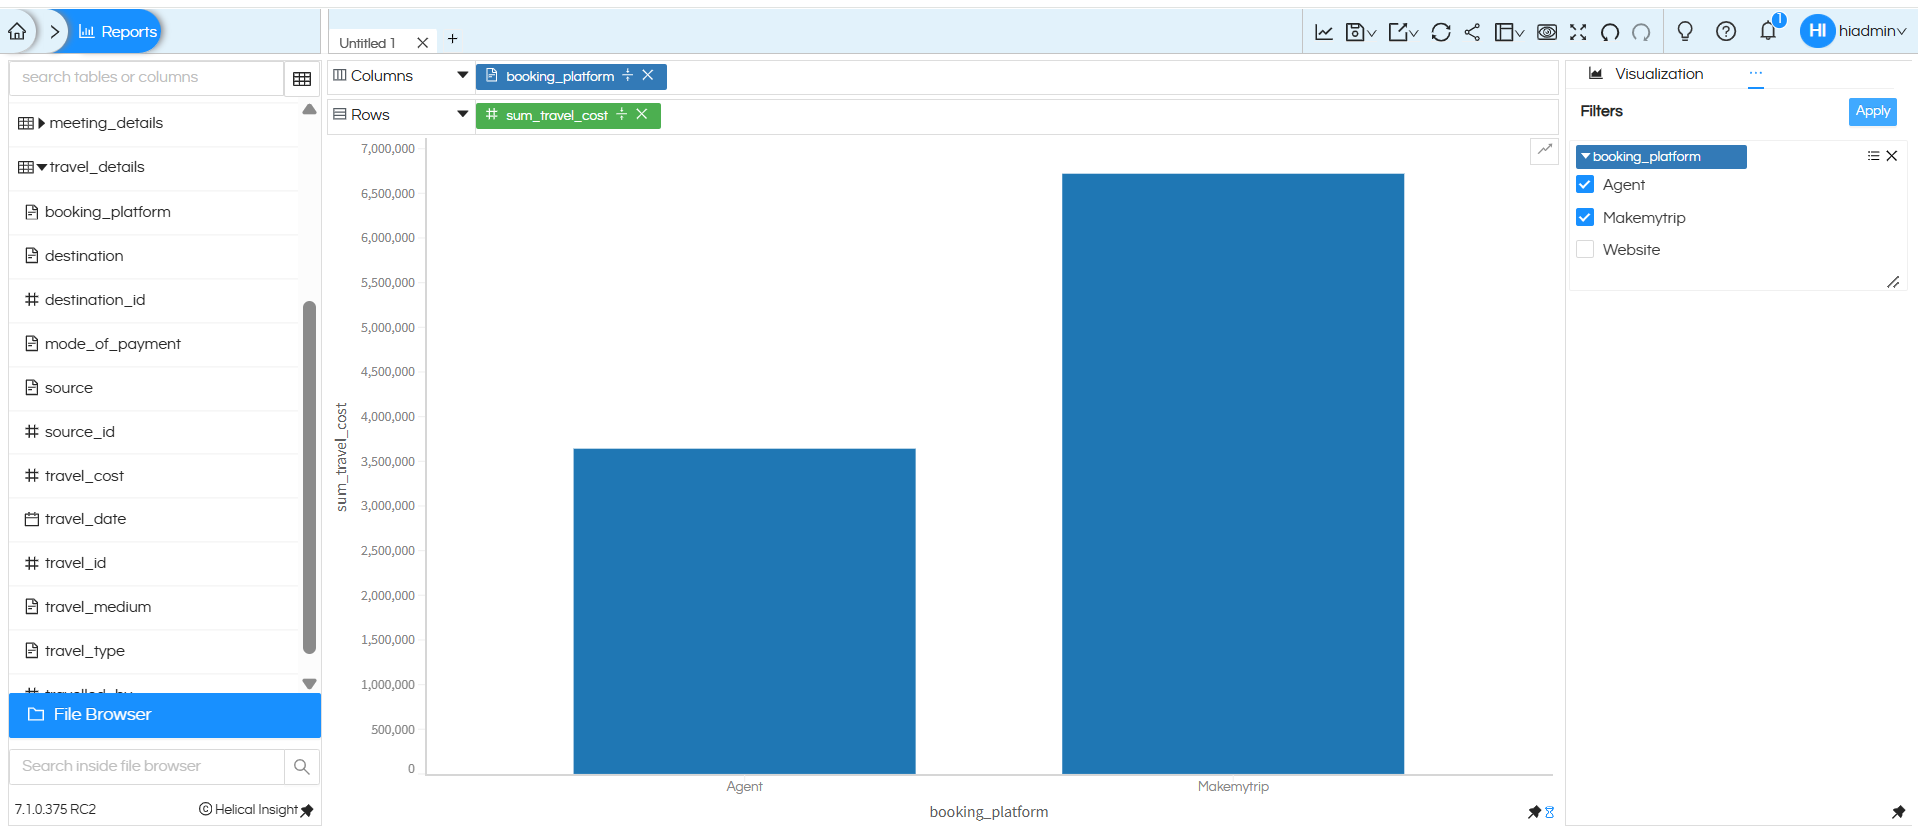
For example, consider a travel expense report that displays travel costs by booking platform. By applying a filter to the booking_platform column, users can view data for selected platforms, such as Agent and Makemytrip, instead of displaying every platform.
Filters can be of various types, such as Single Select, Multiple Select, Date Picker, Date Range Picker, Input Text Box, Slider, etc.
Helical Insight provides multiple ways to add filters while designing a visualization. This blog explains three different methods.
Method 1: Adding Filters from the Metadata Panel
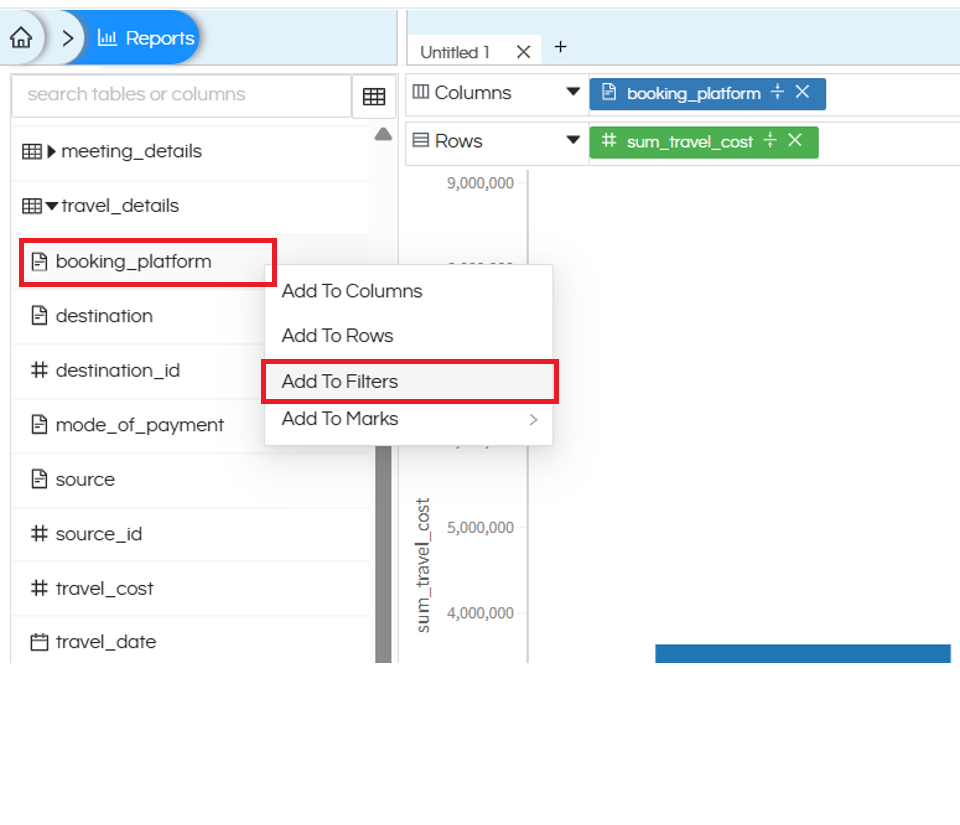
You can add a column to the Filters section directly from the Metadata panel.
Follow these steps:
- Open the report designer and locate the required column in the Metadata panel on the left side.
- Right-click the column that you want to use as a filter.
- From the context menu, select Add To Filters.
- The selected column is added to the Filters section. Select the values you want to include.
Example:
In this example, booking_platform is used as a filter. The values Agent and Makemytrip are selected, while Website is not selected. Click Apply to update the visualization.
Method 2: Adding Filters by Drag and Drop
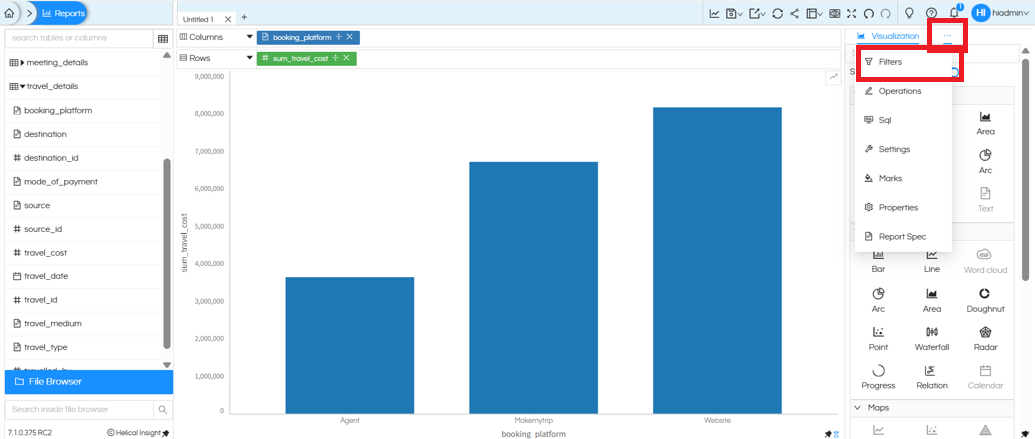
You can also access the Filters section from the Visualization panel.
Follow these steps:
- Open the report designer and locate the Visualization panel on the right side.
- Hover over the three-dot menu beside the Visualization section.
- Select Filters from the menu and click on it.
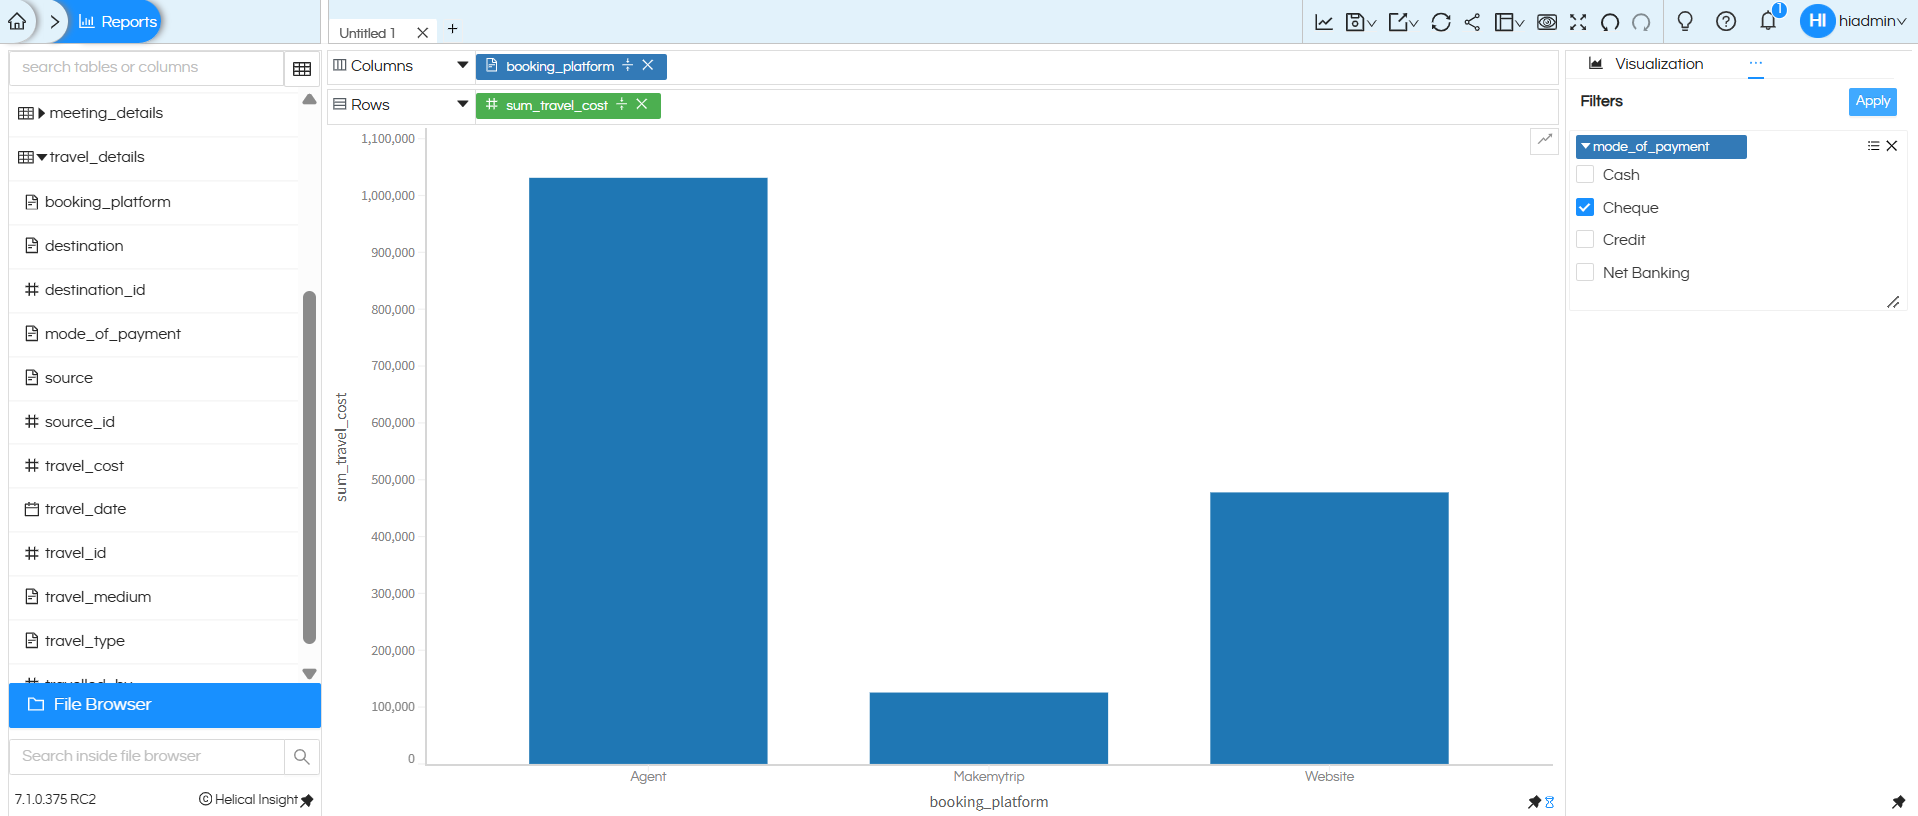
- Drag and drop the required column from the Metadata panel into the Filters section.
Example:
Here, the mode_of_payment column is dragged into the Filters section. The available values include Cash, Cheque, Credit, and Net Banking. Select the required payment modes and click Apply to update the visualization.
Method 3: Using Dragged Fields from Rows/Columns as Filters
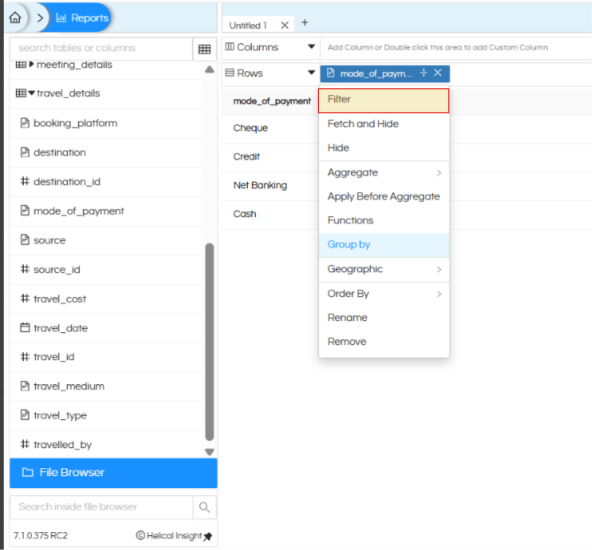
Helical Insight also allows users to add fields to the Filters section directly from the Rows or Columns section.
Follow these steps:
- Add the required field to the Rows or Columns section.
- Left-click the field to open the context menu.
- Select Filter from the context menu.
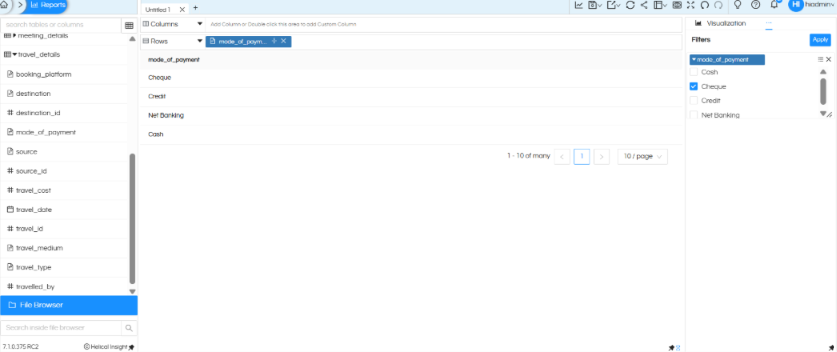
- The selected field will be added to the Filters section.
- Configure the filter and click Apply.
When to Use This Option?
In many cases, we may not want to use the DB field values directly as a filter. Instead, we may need to perform certain operations on the field before using it as a filter. For example, converting values into uppercase or limiting them to the first three characters.
In such scenarios, you can drag the field into the Rows or Columns section, apply the required functions to manipulate the data, and then use the modified field as a filter. The field can even be removed from the Rows or Columns section after adding it to the Filters section.
The following video will help you understand this functionality in more detail.
Further Reading: Filters in Helical Insight
To understand filters and their implementation in Helical Insight in more detail, refer to the following blogs:
-
Filter Conditions:
There are various types of filtering conditions based on the data type to which they are applied, such as Single Select Radio Button, Multi Select, Date Picker, Date Range Picker, Range Selector, etc. The following blog will help you understand the different filtering conditions and the data types to which they are applicable.
Read more:Filter Conditions in Helical Insight
-
Display Filter Section and Value Filter Section – Advanced Mode:
In some cases, we might want to display one value to users but pass a different value in the SQL query. The Display and Value options in Advanced Mode can be used for this purpose. They also allow users to apply additional functions, aggregations, and other operations before displaying or passing values to SQL.
Read more:
Display Filter Section and Value Filter Section – When to Use and How to Use
-
Filters Advanced Mode:
If you would like to ignore the filter’s default behaviour and directly pass the filter value to the Dynamic View, Advanced Mode can be used.
Read more: Filters Advanced Mode in Helical Insight
-
Usage of Filter Expression:
If there are multiple filters and you want to apply complex conditions between them, such as ((Filter 1 AND Filter 2) OR Filter 3), Filter Expression is useful for handling such use cases.
-
Cascading Input Parameters:
This option allows you to implement cascading or interdependent input filters. For example, imagine two filters: the first is Country_Name and the second is State_Name. Based on the value selected in Country_Name, you may want the available values in State_Name to be updated automatically. Cascading Input Parameters help implement this functionality.
Read more: How to Implement Cascading Input Parameters in Helical Insight
-
Relative Dates Filter via New Window Report URL:
Read more: Relative Dates Filter Through New Window Report URL
-
Relative Date Usage:
In many cases, we want a report to open by default, displaying data for relative dates such as the last 7 days, last 30 days, next 1 quarter, or next 6 months. These scenarios can be implemented using the Relative Date Usage options.
Read more: Relative Date Usage in Helical Insight
-
Date/Date Time Usage as Filters:
If you are using Date or Date Time fields as filters, Helical Insight provides several advanced functions. This blog explains how to use these advanced functions for date-based filtering.
Read more: Date/Date Time Usage as Filters in Helical Insight
These resources cover filter configuration, advanced filtering options, filter expressions, cascading parameters, and date-based filtering in Helical Insight.
Need Help with Helical Insight?
For more information or technical assistance, feel free to reach out to our support team at
support@helicalinsight.com. You can also ask questions and connect with the Helical Insight community through our forum: https://forum.helicalinsight.com/.
