In this blog, we will how to connect to a data source in Helical Insight.
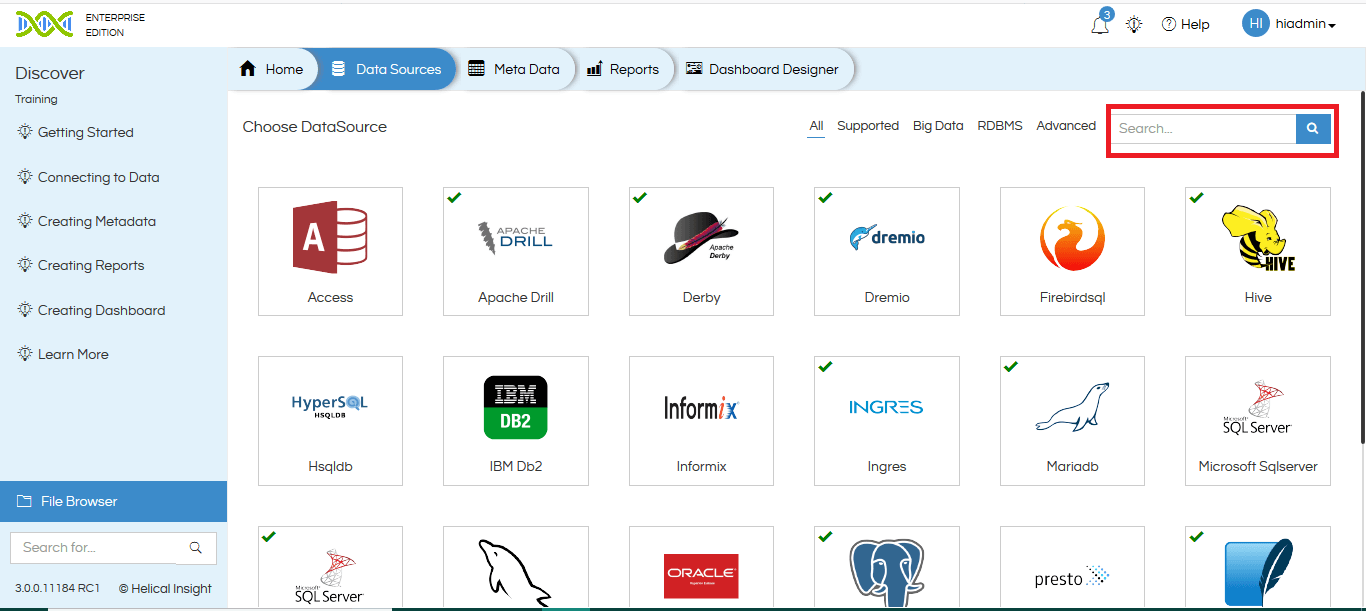
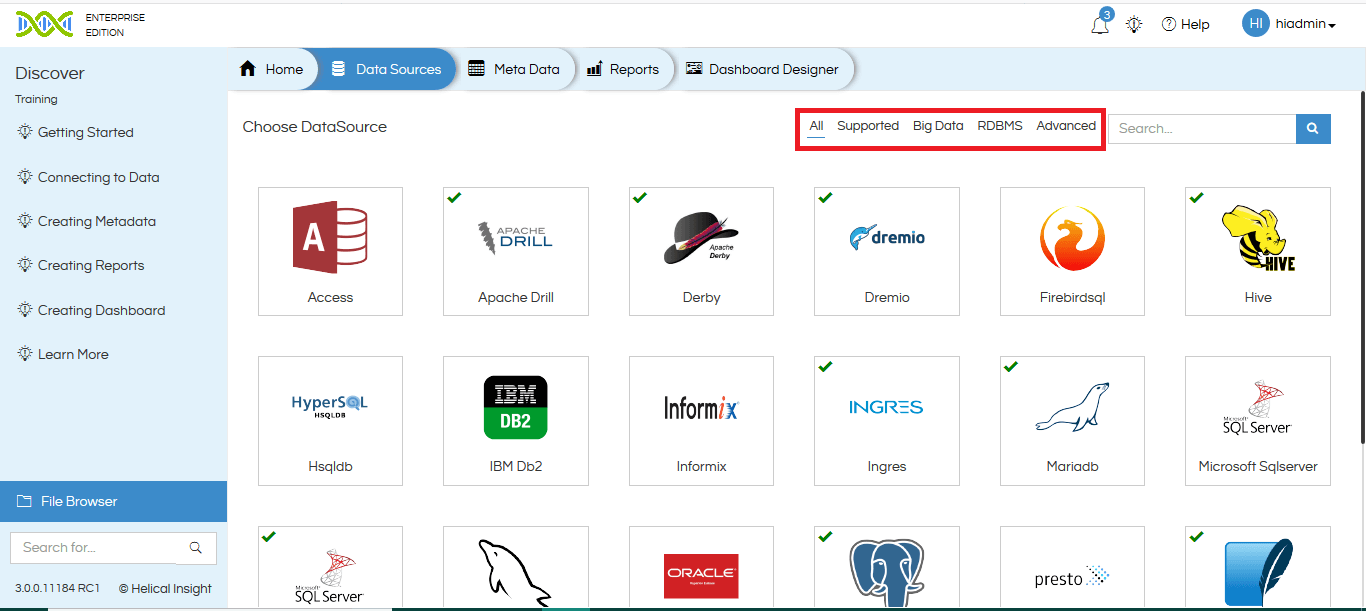
Overview of Data Sources Tab
-
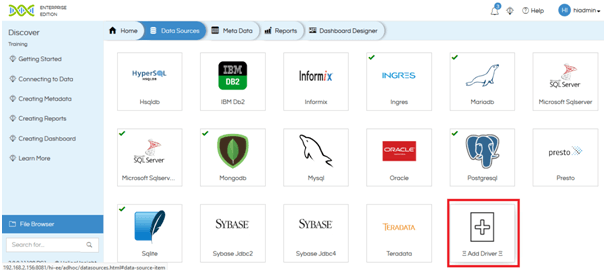
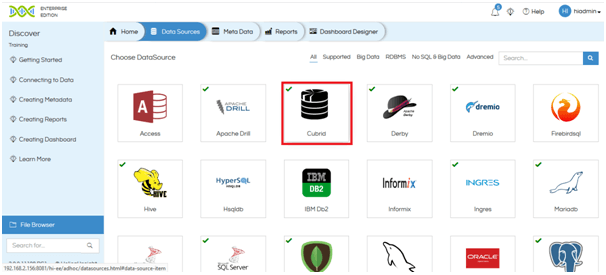
- The list of Data sources is present as a collection of icons for each database.
- User can search for the data source by typing in the search box.
-
- User can also search based on type of database by clicking on the relevant tabs.
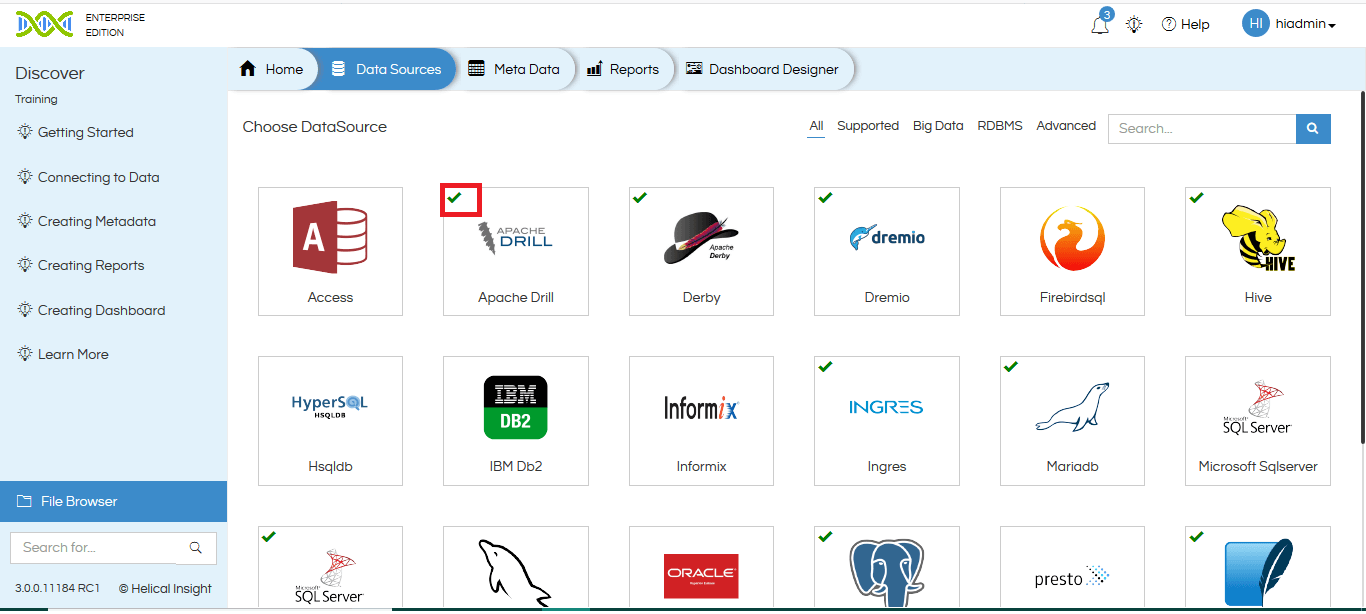
- Data source Icons:
- If there is a green tick mark on the left hand corner of the data source icon, it implies that the driver for that data source is present in the “Drivers” folder of the “hi-repository”.
- If there is no green tick mark on the left-hand corner of the data source icon, it means that the driver for that data source is not present. You will have to add the driver by following the process mentioned here. The driver might not be present because of copy-left license issue. (link to add data source driver)
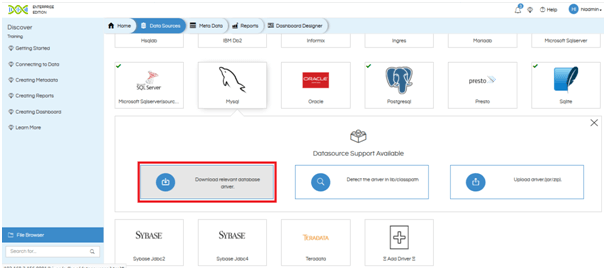
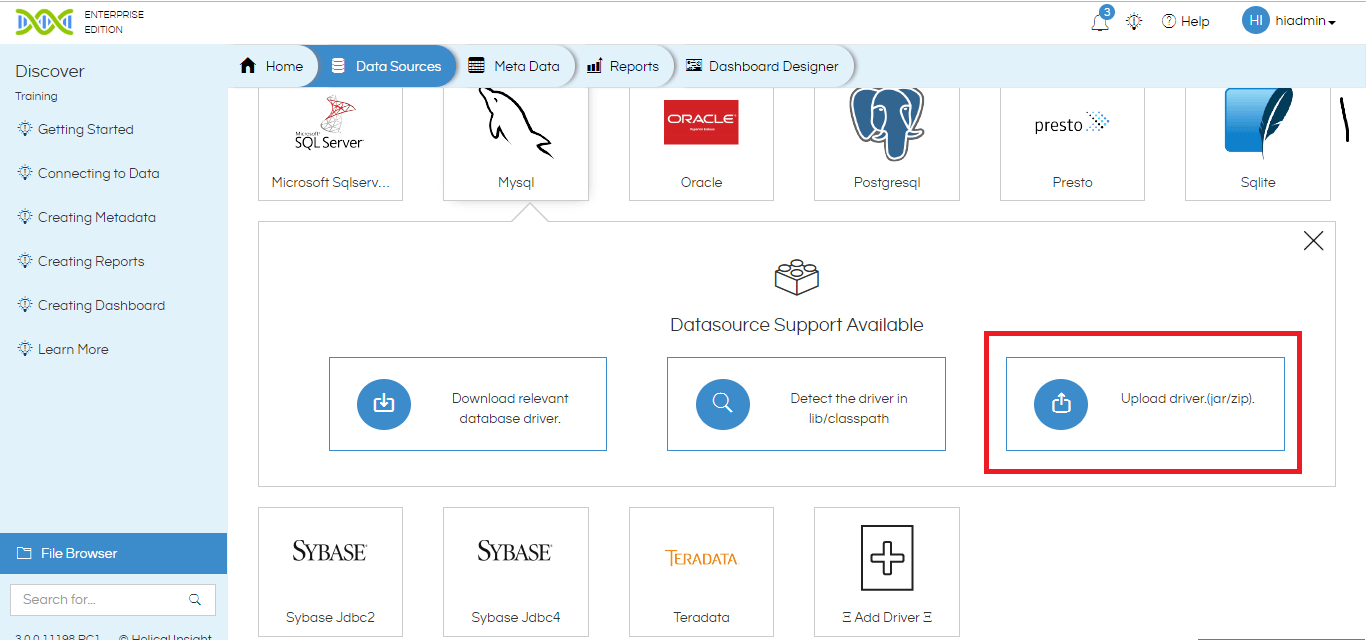
Add Database Driver:
If the tick icon is present then you can immediately make connection and start using it. If the tick icon is not present please follow the below steps to add drive.
-
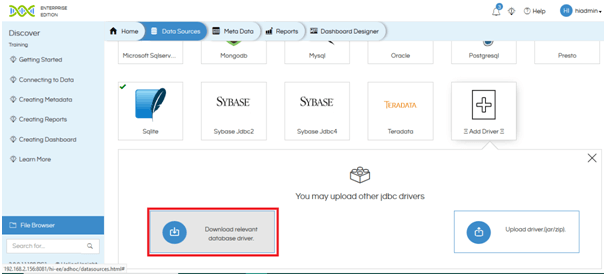
- Click on the database that you want to add the driver for.
- Click on Download Relevant Database Driver. You will be directed to the website from where the driver needs to be downloaded. Make sure that the driver supports the version on database that you are using.
-
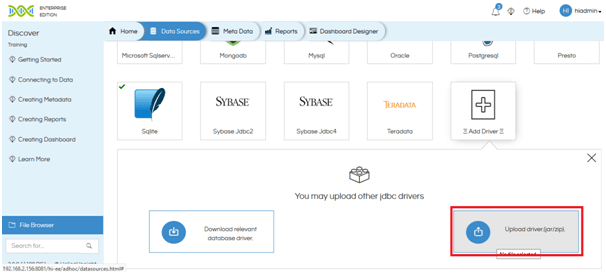
- Once the driver has been downloaded, click on Upload Driver. You will be taken to the File Browser. Select the driver that you have downloaded. The driver should be a jdbc4 .jar or .zip file.
-
- Click on Detect the driver in lib/classpath if the driver is present in the lib/classpath. Helical Insight will detect the driver and automatically upload it in the “Drivers” folder of the server.
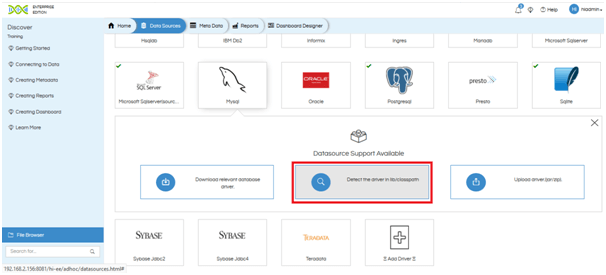
- Once the driver has been uploaded the specific database icon will also have tick icon. The data source connection can be established now, read on to learn how to make datasource connection.
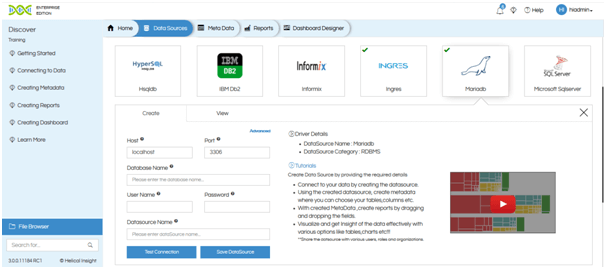
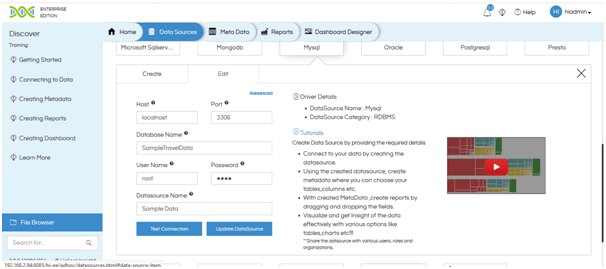
Create a Data source Connection:
-
- Click on the data source that you want to connect to.
-
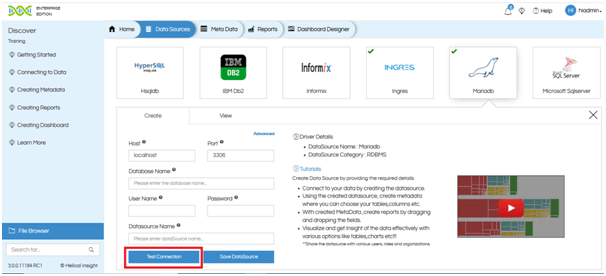
- In the “Create” tab, enter the following details:
- Host: Enter the server details or IP where the database resides.
- Port: Enter the port number to connect to your database server.
- Database Name: Enter the name of your database.
- User Name: Enter the username credential if required to access your database.
- Password: Enter the password credential if required to access your database.
- Data Source Name: Enter a name of your choice to the data source connection.
- In the “Create” tab, enter the following details:
-
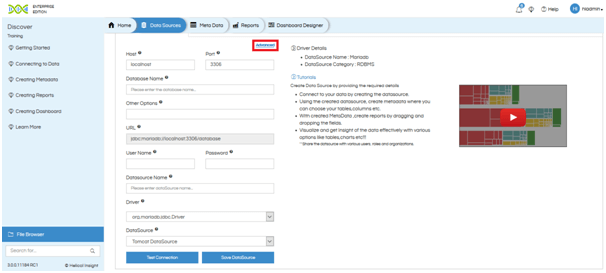
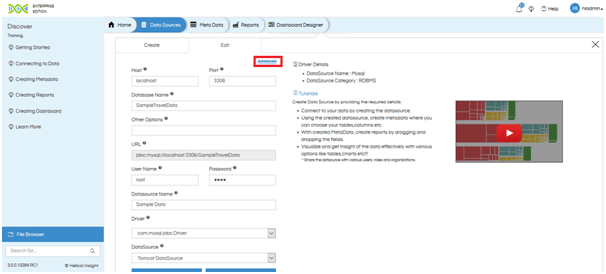
- Advanced: If you have any advanced settings required to access your database, click on “Advanced” link at the top right corner of the Create Tab. The additional fields are:
- Other Options: Enter the properties that are required additionally apart from the Host IP and Port to access the database. E.g.: ?ssl=true. Click on Advanced in order to make advanced level settings like adding properties apart from host and port, changing the data source provider etc. You can use the other options to restrict the tables that will be exposed at the metadata level
Using the advanced options you can also do prefiltering of what all things to show at the metadata level. This prefiltering can happen at tables, columns and schemas:
?HI_SCHEMA_CONTAINS=hi (this will show only the schema names that contain the string hi)
?HI_CATALOG_CONTAINS=t (this will show only the catalog names that contain t)
?HI_CATALOG=travel_data (this will show only travel_data catalog)
Similar strings and regular expression (regex) can be used to restrict the database tables, schema, cataglos that are visible at the metadata level.
So with above method you can initially restrict the size of listing on the metadata page so that it is fast and make initial metadata. Then you can edit the already created datasource to include other table/schema (using the above mentioned method), then edit the metadata created earlier (refresh the cache) and then select additional tables required and make it part of the metadata by using the merge option. This way your create-metadata browser page will never be so heavy and will work fine. - URL: This field shows the URL that is generated to create the JDBC connection. This can be used to verify if the properties are sufficient to access the database.
- Driver: This field shows the driver that is being used to establish the connection. It can be changed if required.
- Datasource: This is the name of the datasource provider. By default it is Tomcat. It can be changed, if required.
- Other Options: Enter the properties that are required additionally apart from the Host IP and Port to access the database. E.g.: ?ssl=true. Click on Advanced in order to make advanced level settings like adding properties apart from host and port, changing the data source provider etc. You can use the other options to restrict the tables that will be exposed at the metadata level
- Advanced: If you have any advanced settings required to access your database, click on “Advanced” link at the top right corner of the Create Tab. The additional fields are:
-
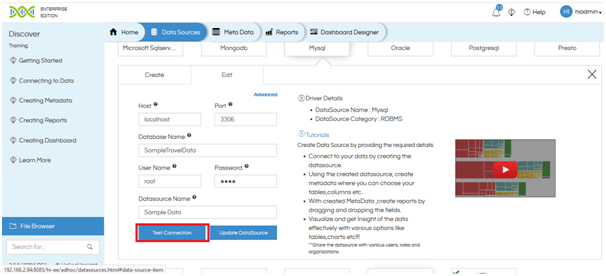
- Once all the details have been filled, click on Test Connection.
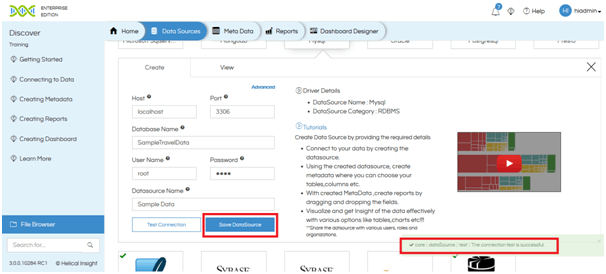
- If the test is successful, click on Save Data Source to save the data source connection.
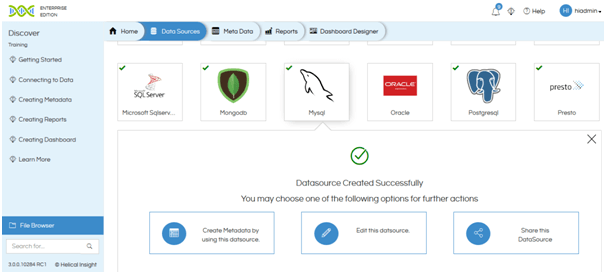
The Data Source is successfully created. You can now use this data source to:
As soon as a data source connection is established, the cache starts getting prepared for use at metadata level. This cache contains the list of schema, catalogs and tables present in the data source. This helps in faster performance at the metadata level.
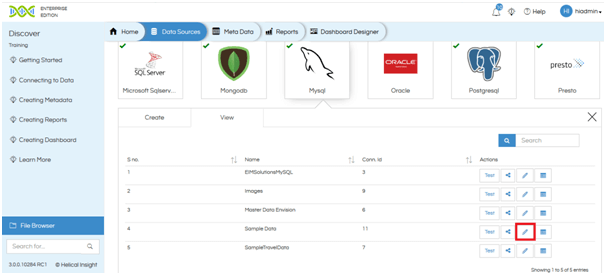
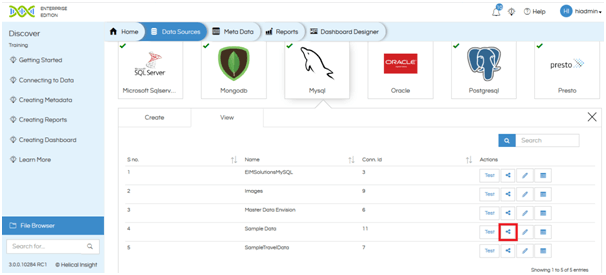
View Data Source:
When data source connections for a particular database are already available, you will be taken to “View” tab when you click on the database name. A list of data source connections that have been created for that database will appear.
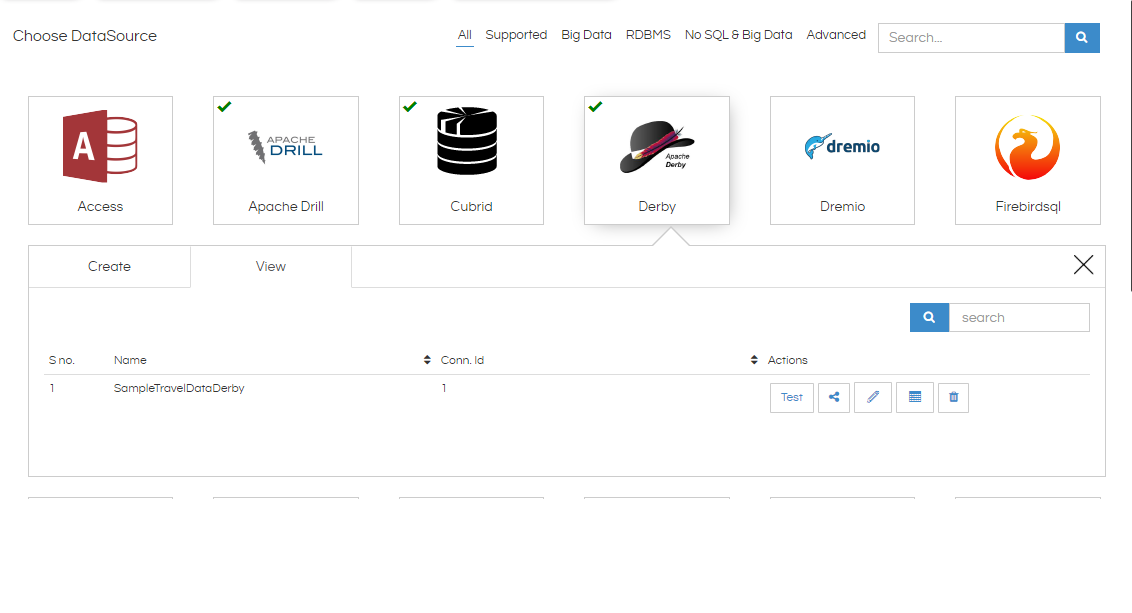
- Search: User can search a particular connection within the list.
- User can sort the connections depending on Name and Connection ID.
- Test: Click on this button to test the connection.
- Edit: Click on this button to edit the data source connection.
- Share: Click on this button to share the data source connection with other users.
- Delete: Click on this button to delete the data source connection.
- Create Metadata: Click on this button to create a metadata from the connection. It is advisable to test the connection before Creating Metadata.
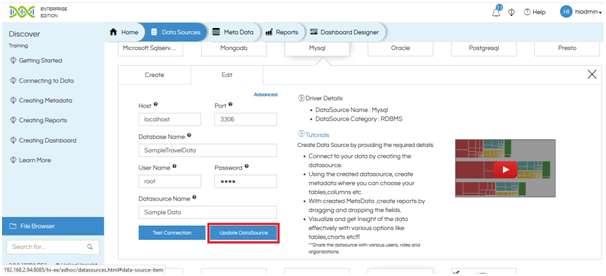
Edit Data Source:
-
- Go to the Data Sources tab next to Home.
- Click on the database icon that contains the connection you want to edit. You will see a list of connections that are present for that database.
-
- Click on the Edit button corresponding to the connection that you want to edit. You will see the connection details.
- Input the details that you want to edit.
-
- Click on Advanced in order to make advanced level settings like adding properties apart from host and port, changing the data source provider etc.
-
- Click on Test Connection.
-
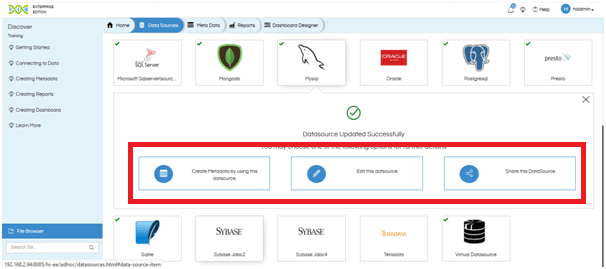
- If Test is successful, click on Update Datasource in order to save the changes that you have made.
- The data source connection has been updated successfully. You can now:
- Create Metadata using this data source
- Edit the data source
- Share the data source
Share Data Source:
-
- Click on Data Sources tab next to Home tab.
- Click on the database in which the data source that you want to share resides. You will see the list of data sources available.
-
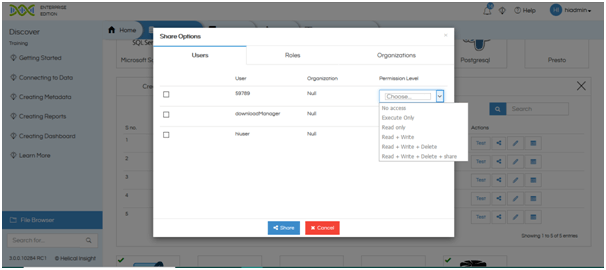
- Click on Share button corresponding to the data source connection you want to share. A screen with the Share Options will appear. There are 3 tabs on this Screen:
- Users: This is a list of all the users that have been defined in the Home screen under User Management Tab. If you want to share the data source details only with a particular user or if you want to change the permission level for a particular user within an organization, select the user and set the permission level.
- Roles: This is a list of all the roles that have been defined in the Home screen under Roles Tab. If you want to share the data source connection details with all users having a particular role, use this option to set the permissions.
- Organizations: This is a list of all the organizations defined in the Home screen under Organizations Tab. If you want to share the data source connection with all the users of a particular organization, you can achieve it by using this tab.
- Click on Share button corresponding to the data source connection you want to share. A screen with the Share Options will appear. There are 3 tabs on this Screen:
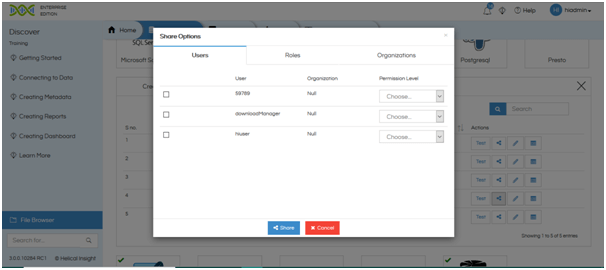
-
- Click on the check box next to the user/role/organization that you want to give the permission for.
-
- Set the permission level for the particular user/role/organization. The following permission levels are available:
- No Access: This level is used to deny access to a particular user, role or organization.
- Execute Only: This level will give only execution rights to the user, role or organization. The user will not be able to see the data source connection details but will be able to retrieve the data. Hence, if you want the users to only view the report/dashboard while not being able to view the data source details, use this particular option.
- Read Only: This level will give Read only access to the user, role or organization. The user can only read the data source details.
- Read + Write: This level will give Read + Write access to the user, role or organization.
- Read + Write + Delete: This level will give Read + Write + Delete access to the user, role or organization.
- Read + Write + Delete + Share: This level will give Read + Write + Delete + Share access to the user, role or organization.
- Set the permission level for the particular user/role/organization. The following permission levels are available:
- Once you have made the necessary changes, click on Share button. The data source will be shared.
Please note that the user level permissions will override the organization level permissions. Hence, if you want to give different permission to a particular user in an organization, you can set the organization permission level according to the general permission levels in the Organizations tab and then modify the permission level for a particular user in the Users tab.
Delete Datasource:
-
- Click on Data Sources tab next to Home tab.
- Click on the database in which the data source that you want to delete resides. You will see the list of data source connections that have been created.
- Click on Delete button corresponding to the data source connection you want to delete. You will get 2 options:
-
- Simple Delete:Select this option to delete the data source connection only.
- Cascaded Delete:Selecting this option will delete all the Metadata, Reports and Dashboards associated with this datasource connection.

-
- Select the type of delete. You will be prompted to confirm your action. Click on OK.
The datasource connection is deleted.
Add New Database:
Helical Insight supports a variety of databases, it also gives you the flexibility of adding all together a new DB even if it is not present in the list. If your database is not found in the list that comes out-of-the-box, you can add the driver by following the process given below:
-
- Click on “Add Driver” icon present at the bottom of the data sources list.
-
- Click on “Download the relevant database driver” in order to download the driver for the database that you want to connect to.
-
- Download the database jdbc driver in .jar/.zip format.
- Click on “Upload driver”. You will be taken to the file browser. Select the driver that you have downloaded. Your driver will be uploaded.
- A new database icon will be generated with the name of the database. You can now create your data source connection for the newly added data source.
For more information you can email on support@helicalinsight.com
