Helical Insight is an Open Source Business Intelligence (BI) tool which supports Informix database. In this article we will cover in detail, how you can connect, analyze, share and use other features of Helical Insight with Informix Database.
Following are the steps to be performed at file system of Helical Insight (hi-repository/System/Admin) when the database is configured for the first time :
Post configuration process involves report creation. Following are the steps to create report with Helical Insight using SQLite Database:
JDBC Driver Configuration
JDBC driver configuration is required through which a database connection can be established with Helical Insight Application. Following are the steps to configure JDBC driver :
- Download latest OpenEdge JDBC Driver.
- Once the driver is downloaded, that driver file needs to insert in a “Drivers” Folder of Helical Insight Application
hi-repository/System/Driversand then immediately it will start appearing in the drop down list of Datasource.
Dialect Configuration
Dialect is used for generating SQL query as per the database selected. In Helical Insight Application, following are the steps to configure dialect :
- Go to
hi-repository/System/Admin. - Open “sqlDialects.properties” file in edit mode using text-editor such as notepad, notepad++.
- Add the below present line at the end of the file in a new line.
com.informix.jdbc.IfxDriver=org.hibernate.dialect.InformixDialectNote: Here, Informix database is having separate Informix dialect.
- Now, save the file.

Note : In case, dialect is not assigned then bydefault MySQL dialect is assigned to the selected database. In result, a sql query will be generated which may or may not support the selected database.
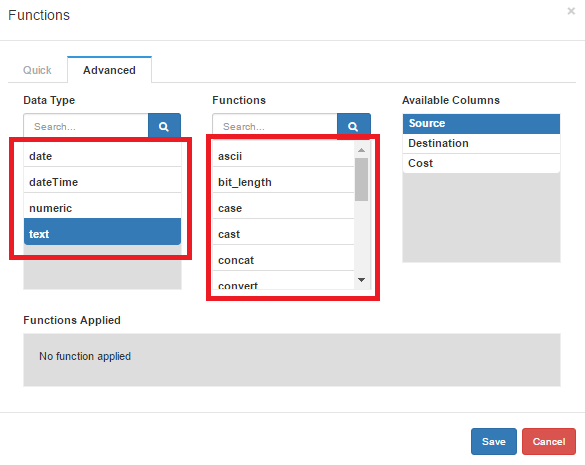
Database Function List Configuration
While creating Adhoc reports, there are database functions which can be applied on datatypes such as text, numeric, datetime, etc. Now, to view the database functions list following are the files needs to be configured :
XML file
This file contains the database functions in the XML format. Using this file, user can modify database functions. The XML file is saved as “databasename.xml” for example, “sqlite.xml” or any name can be assigned. The required file has to be present inside the SqlFunctions folder.
Following are the steps to configure database XML file :
- Download the zip file which contains xml and js files.
- Now, extract the files and insert the
informix.xmlinside theSqlFunctionsfolder.
Folder Path :
hi-repository/System/Admin/SqlFunctions
javascript /js file
Javascript file contains code used for defining the query syntax for the respective database. The JS file name must be same as the name assigned to the xml file of the respective database. The filename is case sensitive.
Following are the steps to configure JS file :
- Download the zip file which contains xml and js files.
- Now, extract the files and insert the
informix.jsinside theSqlFunctionsfolder.
Folder Path :hi-repository/System/Admin/SqlFunctions
sqlFunctionsXmlMapping.properties file
This file is used for configuring the xml file with the respective database. Following are the steps to configure :
- Open
Adminfolder present inside the helical insight repository. - Open
sqlFunctionsXmlMapping.propertiesfile in edit mode using text-editor like notepad++, etc - Insert the code
com.informix.jdbc.IfxDriver=informixin a new line. - Now, save the file.
Folder Path :
hi-repository/System/Admin
Note : In the above code, the name “informix” should match with the name assigned to xml file (informix.xml) and js file (informix.js) .

Create Datasource
This process involves establishing a connection between Helical Insight application and SQLiteDB database.
There are 2 methods available for creating a Datasource in Helical Insight:
Following are the steps shown below to create datasource using available methods :
Method 1 : Front End Approach
- Login to Helical Insight Application. ( For default credentials, click here )
- Click on “Home” button and select “Adhoc” from the list.
- On entering Adhoc Page, click on “Create” button in Datasources
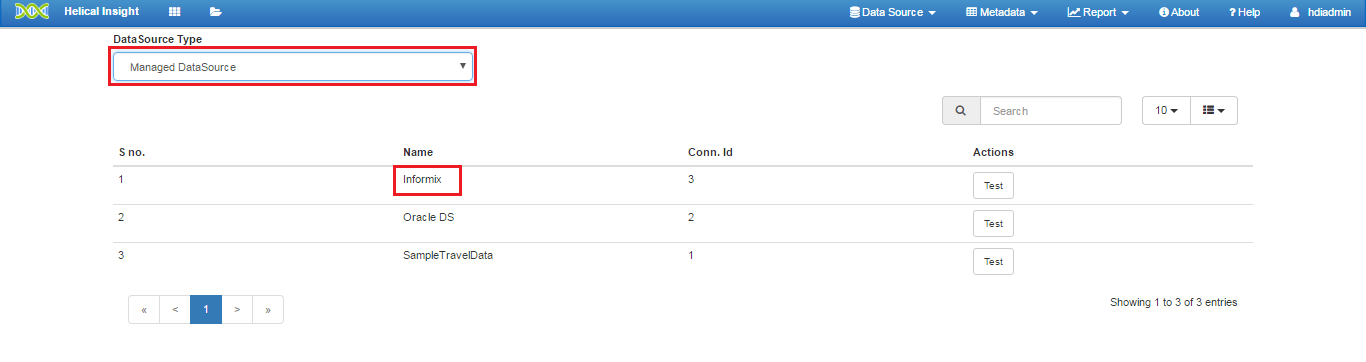
- Select the “DataSource Type” from the given list. In this case, “Managed Datasource” will be used.
- Now, enter the following details as shown in the below image :
- Download latest Informix JDBC Driver.
- Once the driver is downloaded, that driver file needs to insert in a “Drivers” Folder of Helical Insight Application
hi-repository/System/Driversand then immediately it will start appearing in the drop down list of Datasource.
- Now, click on “Test connection” to validate the filled details.
- If the entered details are correct then “The test connection is established” notification is shown.
- Click on “Save Datasource” to confirm.
- Then, next step involves creation of metadata. After saving datasource, from the same page, click on “Metadata” (at the top right )
- Then, click on “Create”.

Datasource Details :
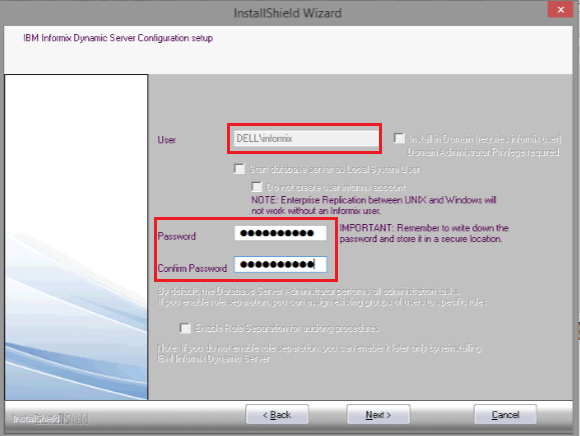
Datesource Name : Informix  ( user-defined name )

Driver : com.informix.jdbc.IfxDriver   ( Informix JDBC type4 driver )

URL : jdbc:informix-sqli://localhost:9088/sysmaster:informixserver=ol_ids_1150_1
(JDBC URL Format:
jdbc:informix-sqli://<HOST>:<PORT>/<DATABASE_NAME>: informixserver=<IBM Informix instance name> )

Username : informix
Password : serverpwd
Here, username and password will be the user and password created during Informix server installation. To view details click here.
Note: If Informix JDBC Driver is not present in the list then it can be added externally. Following are the steps to update driver list :
Further steps will be covered in “Create Metadata” step.
Method 2 : Back End Approach
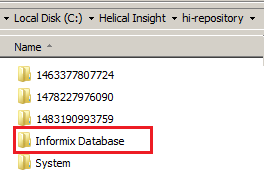
- Go to “hi-repository” folder where a Helical Insight Application is installed and then open the folder.
- Create a New Folder with any name say “Informix Database” inside “hi-repository” folder.
- Now, open a text-editor like notepad, notepad++ , and so on.
- Then enter the following details as given below :
- Connection ID : User can assign any ID (numeric only)
- name : Name of the Datasource to be shown in the Datasource list
- Url : For creating a URL, use the following Informix JDBC URL format
- User: Username
- Password: password
- After entering the details, save the file as “filename.efwd”
Note: Saved file has to be present inside the Informix Database folder of “hi-repository“.
- Now, the Informix connection has been established. ( if entered details are correct )
- Then, next step involves creation on metadata.
- Now, login to Helical Insight Application using any web browser.
- Click on “Home” button and select “Adhoc” from the list.
- Then, Click on “Metadata” Tab and then select “Create”.
C:\Helical Insight\hi-repository
<EFWD>
      <DataSources>
            <Connection id="1" name="Informix EFWD" type="sql.jdbc">
                <Driver>com.informix.jdbc.IfxDriver</Driver>
                <Url>jdbc:informix-sqli://localhost:9088/sysmaster:informixserver=ol_ids_1150_1</Url>
                <User>informix</User>
                <Pass>serverpwd</Pass>
             </Connection>
      </DataSources>
</EFWD>
jdbc:informix-sqli://<HOST>:<PORT>/<DATABASE_NAME>: informixserver=<IBM Informix instance name>For username and password refer the below image. Username and password is configured during Informix server installation.
Further steps will be covered in “Create Metadata” step.
Create Metadata
For creating a metadata it is mandatory to have established datasource connection which is explained in create datasource.
- On clicking “Create” from “Metadata” tab, “Datasource Type” selection page is displayed.
- Select the “DataSource Type” from the given list.
- For Method 1 : Select DataSource Type: Managed Datasource
- For Method 2 : Select DataSource Type: Plain JDBC Datasource
- Click on the Datasource Name using which metadata will be created.
- For Method 1 : Datasource Name “Informix” is used. Any name can be assigned during configuration.
- For Method 2 : Datasource Name “Informix EFWD” is used. Any name can be assigned during configuration.
- Now , a metadata page appears where various operations can be performed such as table/column aliasing, defining joins, creating views and apply table/column/data security conditions.
- Click on “Save” to create metadata.
- After clicking “Save” button, a window will appear known as File Browser. Using File Browser, a metadata file is saved in the file-repository of Helical Insight.
- Then, click on “Save Metadata” to confirm.
- Now, metadata file is ready for creating Adhoc Reports.

Adhoc Reports :
Learn how to create Adhoc Report, click here
For further assistance, kindly contact us on support@helicalinsight.com or post your queries at forum.helicalinsight.com
